Category: Breakfasts

Start your day off right, whether you’re in the mood for on-the-go snacks or fluffy pancakes and egg dishes

  • Easy Halloween Breakfast Idea: Strawberry Pancake Monsters

    Easy Halloween Breakfast Idea: Strawberry Pancake Monsters

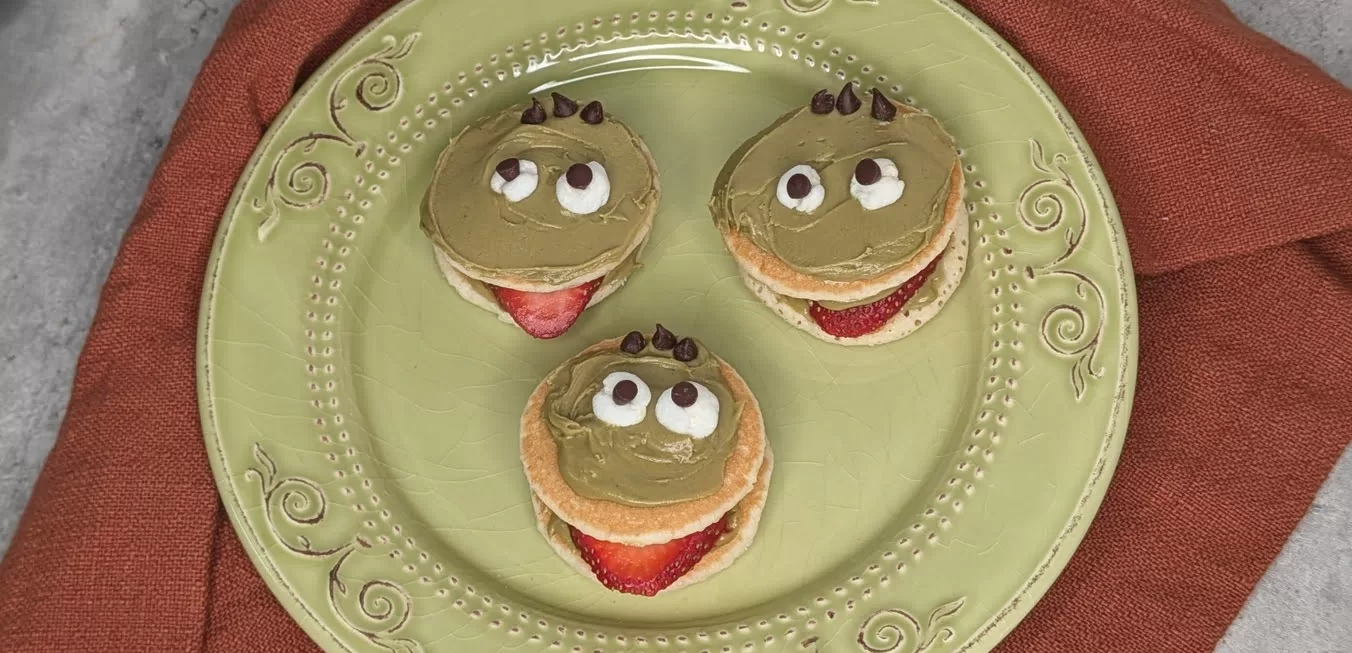
    Just because Halloween is on a school day doesn’t mean that you can’t add a little magic to your morning. Or that you need to set your alarm two hours early to labor over an over-the-top meal. These Strawberry Pancake Monsters are an easy Halloween breakfast you can whip up in less than 10 minutes (seriously, I timed it). Pair it with our Spooky Jack-O’-Lantern Marshmallow Milk, and you’ve got a surefire way to surprise and delight your family…without exhausting yourself before noon.

    an easy halloween breakfast: strawberry pancake monsters with marshmallow eyes, shown close up
    Photos: Candace Braun Davison

    The Keys to Nailing These DIY Strawberry Pancake Monsters:

    • Start with frozen mini pancakes. If you prefer homemade, whip them up the night before, place them between sheets of parchment paper and place in a resealable plastic bag in the fridge or freezer. (They’ll reheat in the microwave in 20-30 seconds.)
    • If your kids aren’t into pistachio butter, try adding a few drops of green food coloring to peanut butter or the nut butter of your choice.
    • For a faster shortcut, sub candy eyes for the mini marshmallows with mini chocolate chips. The latter option is tastier in my family’s opinion though. (The candy eyes often wind up in the trash in our house, but they are quick to toss on and look cute!)

    How to Make Strawberry Pancake Monsters for Breakfast

    an easy halloween breakfast: strawberry pancake monsters with marshmallow eyes, shown close up

    Strawberry Pancake Monsters

    These strawberry and pistachio butter mini pancake monsters make for a fun, easy Halloween breakfast you can whip up in minutes.
    Prep Time 9 minutes
    Cook Time 1 minute
    Total Time 10 minutes
    Course Breakfast
    Cuisine American
    Servings 1

    Ingredients
      

    • 6 frozen mini pancakes
    • 2 tbsp pistachio butter (or nut butter with green food coloring)
    • 3 strawberry slices
    • 3 mini marshmallows
    • 6 mini chocolate chips (plus more for monster "hair")

    Instructions
     

    • Slather a light layer of pistachio butter (or nut butter of your choice) onto all six pancakes. Warm in the microwave for 30 seconds, if pancakes are frozen.
    • Top three pancakes with strawberry slices. Add remaining pancakes on top, pistachio-butter-coated-side-up (so it looks like a green monster head).
    • Break each mini marshmallow in half and smoosh it with your fingers to flatten it. Stick a mini chocolate chip onto the cut-open part of the marshmallow (it'll be sticky and help the chocolate chip adhere to it). Stick the "eyes" on each monster.
    • Add remaining chocolate chips as "hair" along the top of each monster, if desired. Serve as-is or with a drizzle of maple syrup.
    Keyword brunch, halloween, holiday, pancakes

  • Baked Cinnamon Sugar Pumpkin Donuts

    Baked Cinnamon Sugar Pumpkin Donuts

    Apple cider donuts get all the glory each fall, but pumpkin treats deserve more fanfare. Pumpkin donuts, specifically. The pureed gourd makes this dessert extra moist, which is complemented by a hearty jolt of cinnamon sugar to add some sweetness and spice. It’s well balanced, which is not what I can say about my diet after I devoured, ahem, six mini donuts over the course of a single afternoon.

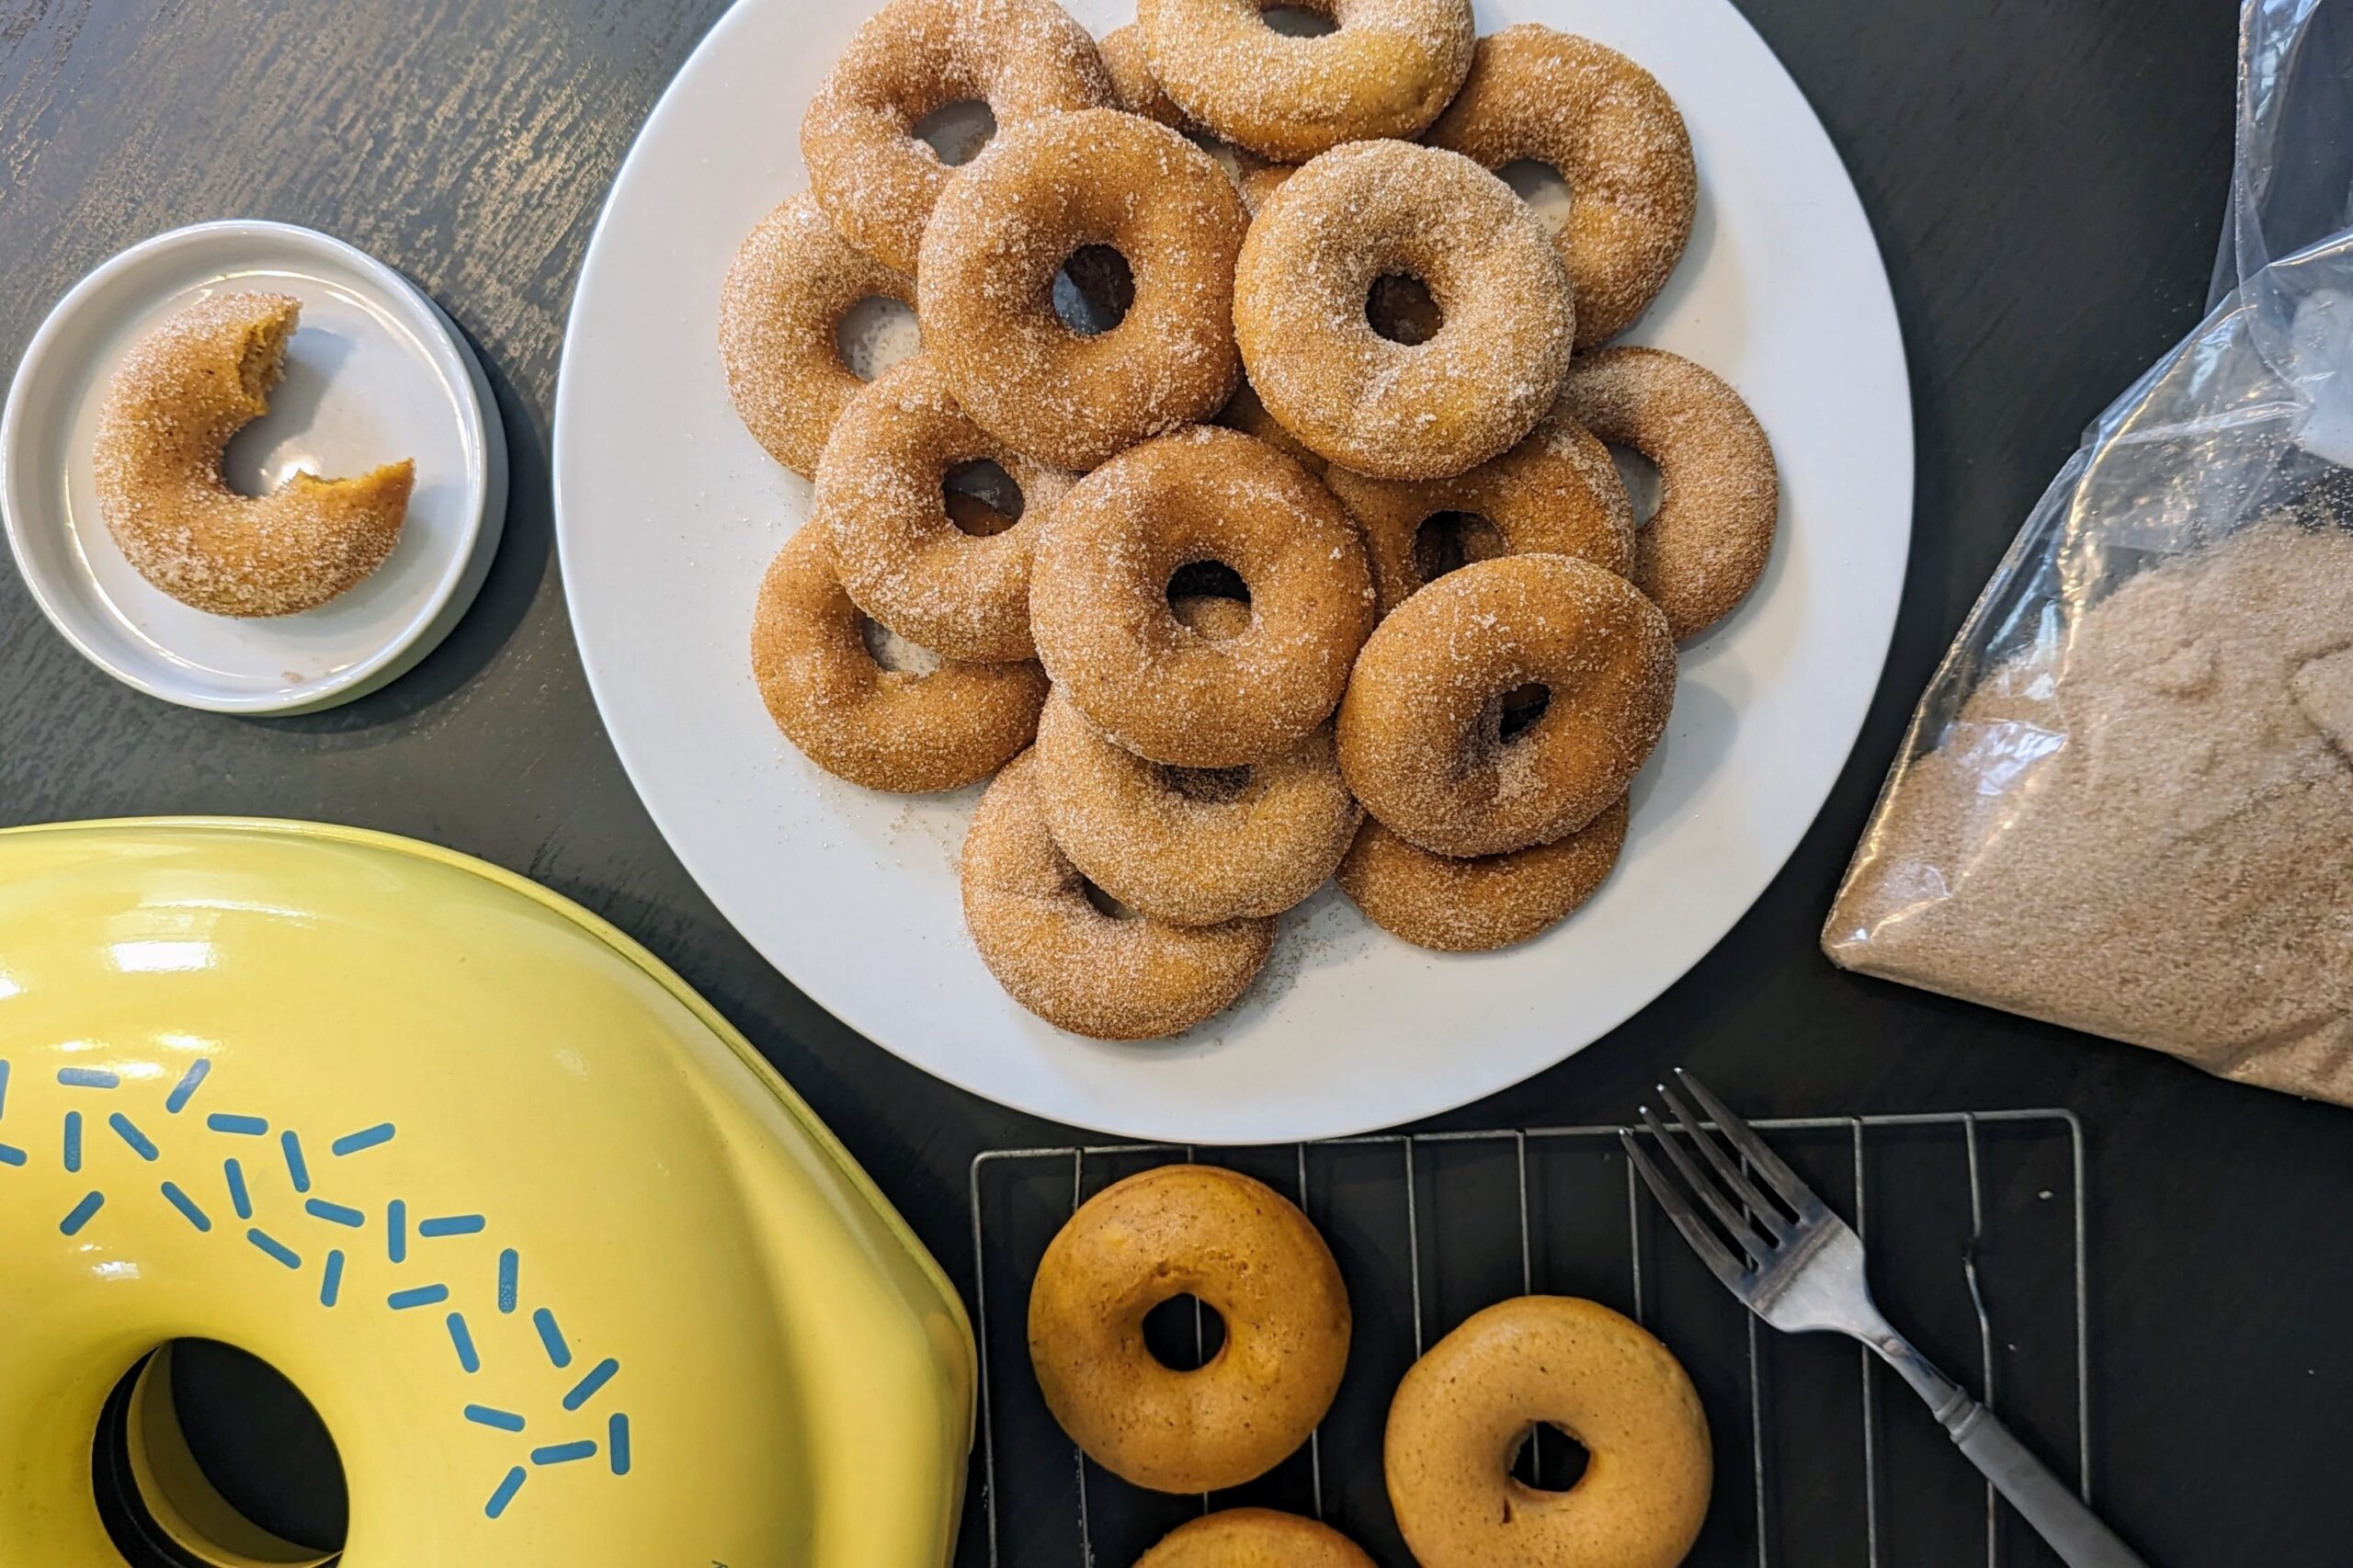
    You could make these cinnamon sugar pumpkin donuts in a traditional donut pan, cooking them at 350 degrees for about 15ish minutes, as King Arthur Flour recommends. My version makes a few minor modifications, and I used a mini donut machine.

    Photos: Candace Braun Davison

    What’s the Best Mini Donut Machine to Use?

    Honestly, they’re all pretty comparable. I love the giant donut aesthetic of my ol’ Sunbeam, but it’s no longer made. Dash sells a pretty solid machine that whips up seven mini donuts at a time for $22 on Amazon, but if you want something that takes up slightly less shelf space, you could go with the Babycakes design (which is 4 inches smaller). Just know that that model makes four donuts at a time, so you’ll be baking in bigger batches.

    Can I Substitute Pumpkin Pie Spice for the Seasonings?

    Yes! Mix in two teaspoons and call it a day.

    Photos: Candace Braun Davison

    Can I Use Pumpkin Pie Filling Instead of Pumpkin Puree?

    I wouldn’t recommend it. The added sweetness and slightly different viscosity could affect bake times and overall flavor.

    Onto the recipe!

    cinnamon sugar pumpkin donuts

    Baked Cinnamon Sugar Pumpkin Donuts

    Step aside, cider donuts—these minis are every bit as addictive. (Recipe adapted from King Arthur Flour's version for simplicity and to work with a mini donut maker.)
    Prep Time 15 minutes
    Cook Time 30 minutes
    Total Time 45 minutes
    Course Breakfast, Dessert
    Cuisine American
    Servings 30 mini donuts

    Equipment

    • measuring cups
    • 1 large mixing bowl
    • 1 silicone spatula
    • 1 mini donut maker
    • 2 large resealable bags

    Ingredients
      

    Pumpkin Donuts

    • 1/2 cup canola or vegetable oil
    • 3 eggs
    • 1 1/2 cups sugar
    • 1 1/2 cups pumpkin puree
    • 2 teaspoons cinnamon
    • 1 1/2 teaspoons salt
    • 1 1/2 teaspoons baking powder
    • 1 3/4 cups all-purpose flour

    Cinnamon Sugar Coating

    • 1 tablespoon cinnamon
    • 1 cup sugar

    Instructions
     

    • Make the Pumpkin Donuts: In a large mixing bowl, whisk—or beat using an electric mixer—the oil, eggs, sugar, pumpkin and cinnamon. Stir in salt, baking powder and flour. Pour batter into a large resealable bag.
    • Spritz the wells of the donut maker with cooking spray or grease with a little vegetable/canola oil. Heat, and when it's ready to cook, snip a corner of the resealable bag. Use that to pour batter into each donut mold in the donut maker, filling them about two-thirds full. Close the lid and bake according to the machine's instructions, about 3 to 5 minutes per batch.
    • Use a fork to remove each batch of donuts, placing them on a cooling rack.
    • Make the Cinnamon Sugar: In a large resealable bag, combine cinnamon and sugar. As you're ready to serve the donuts (preferably still warm but not hot), toss a few in the bag, seal and shake to coat them. Only coat as many donuts as you plan on eating; otherwise, the coating will get moist and soggy.
      Store the donuts in a resealable bag at room temperature for up to 3 days.
    Keyword cinnamon sugar, donuts, fall, pumpkin
  • Shortcut, Copycat Starbucks Pumpkin Scones (No Kneading!)

    Shortcut, Copycat Starbucks Pumpkin Scones (No Kneading!)

    Hold up—did Starbucks discontinue the pumpkin scone?! I know I’m not the only one wondering this when, yet again, the coffee chain unveiled its fall lineup…sans vanilla-glazed treat. Heartbreakingly, it’s at least off the shelf for a second year, a fact Starbucks confirmed via tweet, while recommending grabbing a pumpkin cream cheese muffin instead.

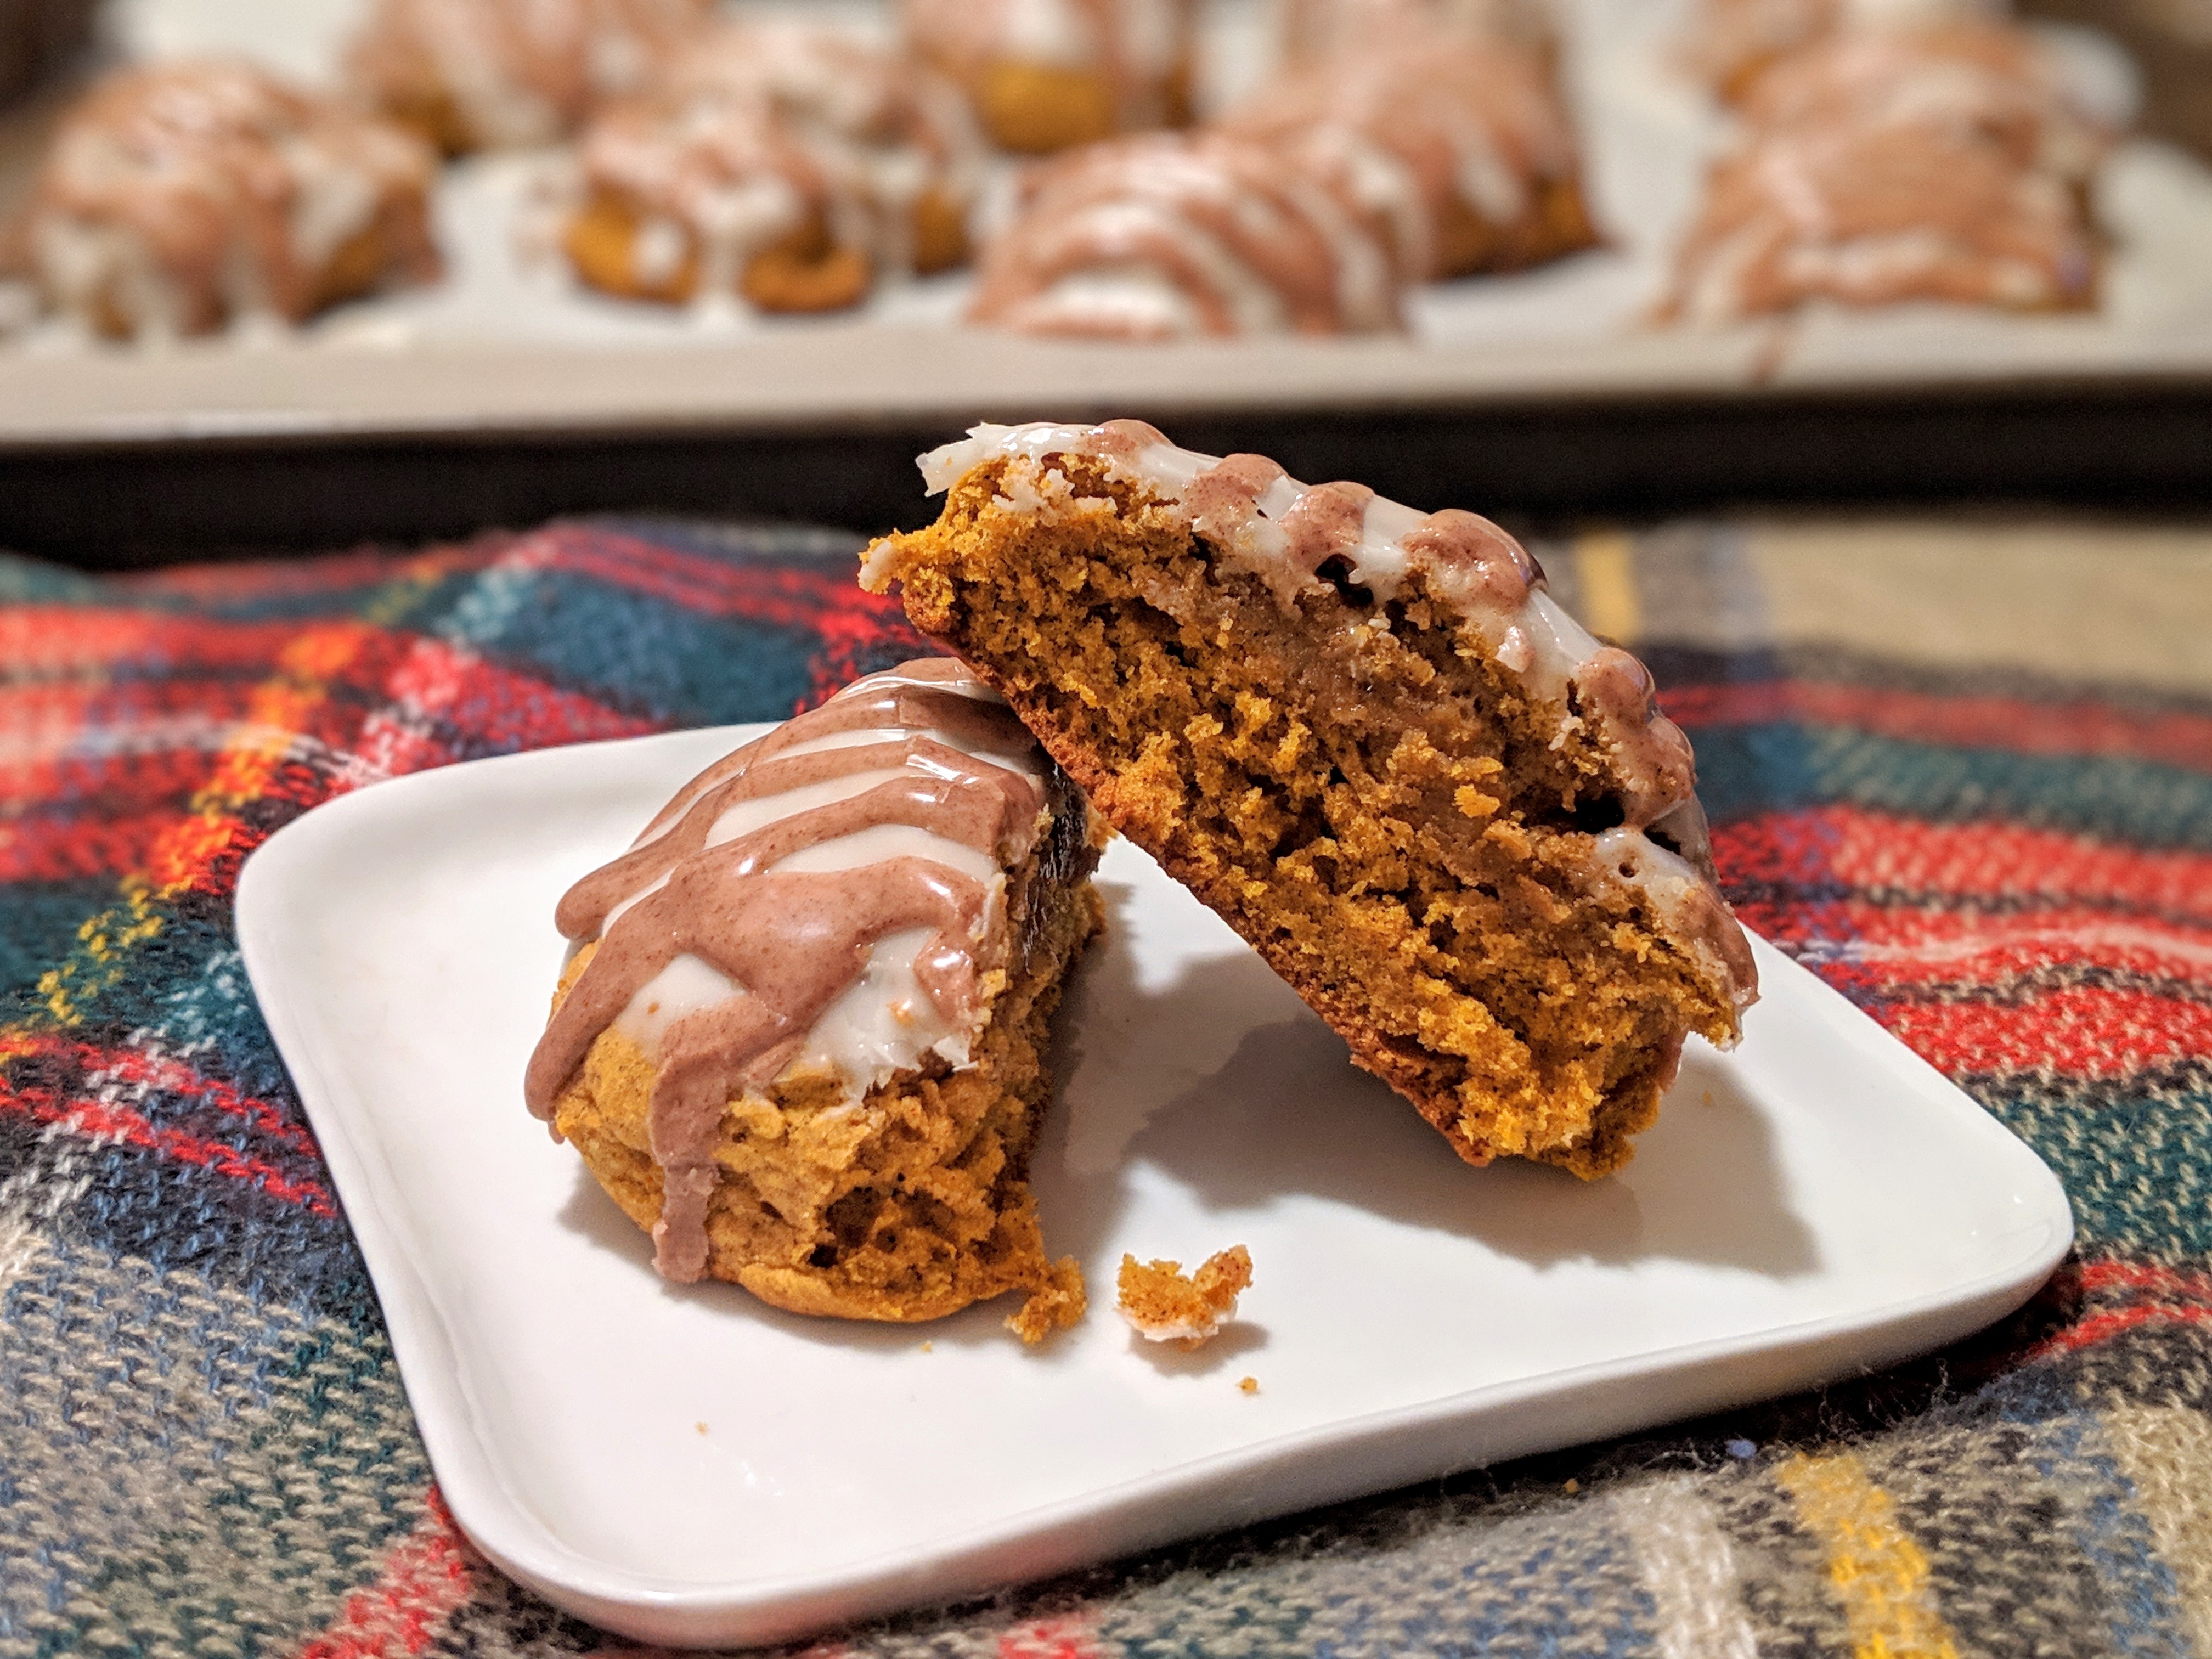
    Sure, the pumpkin cream cheese muffin is great, but it’s no scone. For me, that was my fall indulgence (sorry, PSL); the snack that ushers me into sweater weather. Copycat Starbucks Scones Photos: Candace Braun Davison

    Given my love of the scone—and how often I’d head to the ‘Bucks, only to find out it’s sold out—I took matters into my own hands, deciding to make a copycat pumpkin scone, glaze and all. First, I started by researching what was out there. And after seeing half the recipes online, I knew I needed a few shortcuts. Because, well, I’m lazy. And I had a newborn at home, so any project that used to take me 30 minutes to do now takes approximately 3 full days. So my only shot at actually enjoying scones is to take a few liberties, and you know what? You can’t taste the difference. Scout’s honor.

    Copycat Starbucks Scones recipe

    How We Modified a Pumpkin Scone Recipe to Make It Easier (and No-Knead)

    I used Damn Delicious’s recipe as the base, then started adapting it from there. I don’t have time to knead dough, and even with a liberal flouring of my hands and every surface, it was still a little too sticky to work with, so I simply used a cookie scoop instead of carefully rolling and cutting the dough into triangles. Different shape, same flavor and texture. And fewer things to clean. I also eliminated some of the spices, in favor of Pumpkin Pie Spice, and bumped up the brown sugar, because that caramel-y sweetness really makes the treat stand out.

    Easy Starbucks-Inspired Pumpkin Scones Recipe

    Try it yourself: 

    Shortcut, Copycat Starbucks Pumpkin Scones

    Ingredients

    • FOR THE SCONES:
    • 2 c all-purpose flour
    • 1 tsp baking soda
    • 1/4 tsp salt
    • 1 tsp cinnamon
    • 1 1/2 tsp pumpkin pie spice
    • 1/2 c packed brown sugar
    • 1 stick cold butter, cut into cubes
    • 1/2 c pumpkin puree
    • 3 tbsp milk
    • 1 large egg
    • 1 tbsp vanilla extract
    • FOR THE GLAZE:
    • 1 c powdered sugar
    • 1 1/2 tbsp milk
    • 1/2 tsp vanilla extract
    • FOR THE PUMPKIN SPICE DRIZZLE:
    • 1 1/3 c powdered sugar
    • 1 tbsp milk
    • 1/2 tsp pumpkin pie spice

    Instructions

    1. Preheat oven to 400 degrees F.
    2. Make the Pumpkin Scones: In a large mixing bowl, combine flour, baking soda, salt, cinnamon, pumpkin pie spice and brown sugar. Add cubes of butter, using your hands (or a stand mixer with the paddle attachment, set to low speed) to mix it in, forming a lumpy, sand-like mixture.
    3. In a separate bowl, combine pumpkin puree, milk, egg and vanilla extract. Slowly add to the dry mixture, mixing until a thick dough forms. Use a cookie scoop or large spoon spritzed with cooking spray (or canola oil, or butter) to scoop out large, golf ball-sized blobs of dough. Place on a parchment-lined baking sheet about 2 inches apart, using your hand to smoosh them down a little.
    4. Bake for 10-11 minutes. If you gently press the top of the scone, it should be firm but springy to the touch (the cake pushes down but springs back up afterward). Set aside to cool.
    5. Make the Glaze: Combine the powdered sugar, milk and vanilla extract. You may need to add more powdered sugar, a spoonful at a time, until the glaze is as thick as Elmer’s Glue. Dip the cooled scones into the bowl of glaze, coating the tops entirely. (I just flip them upside down and dip them into the glaze, like you would frosting a donut.)
    6. Make the Pumpkin Spice Drizzle: Combine ingredients in a small bowl. Like the glaze, you may need to add a little powdered sugar if it’s too runny. Or add a spoonful of milk at a time, stirring in between additions, to loosen it up so it’s easy to drizzle. (I like a glue-like consistency, which I pour into a Ziploc bag, snipping off one end so I can draw nice, clean lines.) Zigzag the drizzle atop each cooled scone to garnish it. Let scones sit for about 5 minutes, so the drizzle can harden a bit, before serving.
    https://www.lifebetweenweekends.com/easy-copycat-starbucks-pumpkin-scone-recipe/

    Editor’s Note: This recipe debuted in November 2018. It has since been updated for you to enjoy today (and to ensure it still holds up!).

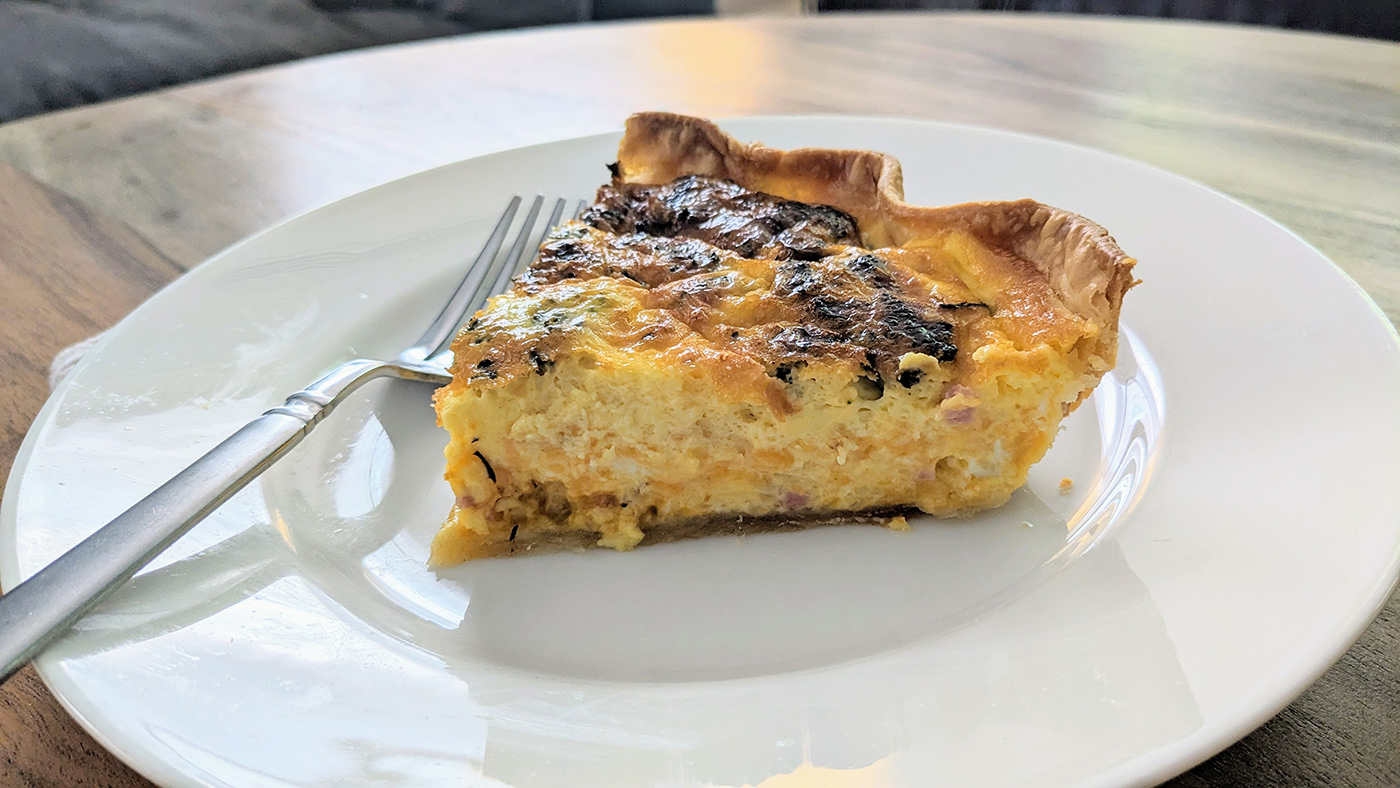
  • Broccoli Cheddar Bacon Quiche: The Easy Breakfast to Serve a Crowd

    Broccoli Cheddar Bacon Quiche: The Easy Breakfast to Serve a Crowd

    As much as I love a fluffy stack of pancakes, they’re a pain to serve to a group. You’re flipping forever. A quiche, however, feels faaahncy even though it’s a cinch to throw together, especially if you sauté the broccoli and cook the bacon ahead of time. Heck, even if you don’t, it’s not that big of a time commitment.

    When making this broccoli cheddar bacon quiche, for example, I typically cook the bacon in the oven while I sauté the broccoli and let the pie crust thaw (and yes, I use frozen, store-bought dough), then throw it all together in a pie plate with the cheese and egg mixture and let my oven do the rest of the work.

    broccoli bacon cheddar quiche slice on plate

    What to Serve with Quiche:

    • Fresh berries
    • Tossed greens with a basic vinaigrette (arugula, spinach, pepper, oil, vinegar & a squirt of lemon can go a long way)
    • Sliced oranges, melon or other fresh fruit
    • Hash browns
    • English muffins with butter and jam

    My Go-To Broccoli Cheddar Bacon Quiche Recipe:

    broccoli bacon cheddar quiche slice on plate

    Broccoli Bacon Cheddar Quiche

    An easy weekend brunch recipe to please a crowd.
    Prep Time 20 minutes
    Cook Time 35 minutes
    Total Time 55 minutes
    Course Breakfast, Main Course
    Cuisine French
    Servings 4

    Equipment

    • 1 Baking sheet
    • parchment paper
    • oven mitts
    • medium-sized sauté pan
    • 1 (9-inch) pie plate
    • 2 dinner plates
    • 2 paper towels
    • 1 mixing bowl
    • 1 whisk

    Ingredients
      

    • 1/2 pound thick-cut bacon
    • 1 tbsp vegetable or canola oil
    • 1 head broccoli, chopped into small florets
    • 1 9-inch pie crust, thawed
    • 1 cup shredded sharp cheddar cheese
    • 3 large eggs
    • 1 3/4 cups half-and-half
    • 1/4 tsp black pepper
    • 1/4 tsp salt

    Instructions
     

    • Prepare the Bacon: Preheat oven to 350 degrees F. Place slices of bacon on a parchment-lined baking sheet and cook for 15 to 18 minutes.
    • Prepare the Broccoli: As the bacon cooks, add canola/vegetable oil to a medium-sized sauté pan and warm on the stovetop over medium heat. Add broccoli florets and cook, stirring occasionally, until softened and lightly charred, about 3 to 4 minutes. Place on a paper towel-lined plate.
    • Prepare the Quiche: Roll out the pie crust in a 9-inch pie plate. Sprinkle shredded cheddar all over. Set aside.
    • In a mixing bowl, whisk together eggs, half-and-half, pepper and salt. Pour into the crust.
    • Once the bacon has cooked, place on a paper towel-lined plate to absorb excess grease and increase the oven temperature to 425 degrees F. Let the bacon cool for a few minutes, then chop into bite-sized pieces and sprinkle all over the egg mixture.
    • Bake quiche for 30 to 35 minutes, or until the center has set and is no longer gooey. Let cool for 5 to 10 minutes to set before serving.
    Keyword bacon, breakfast, brunch, cream cheese, deviled eggs, quiche

    This post contains affiliate links, which help fund the operation of the site.

  • Buddy the Elf-Inspired Breakfast Pancakes

    Buddy the Elf-Inspired Breakfast Pancakes

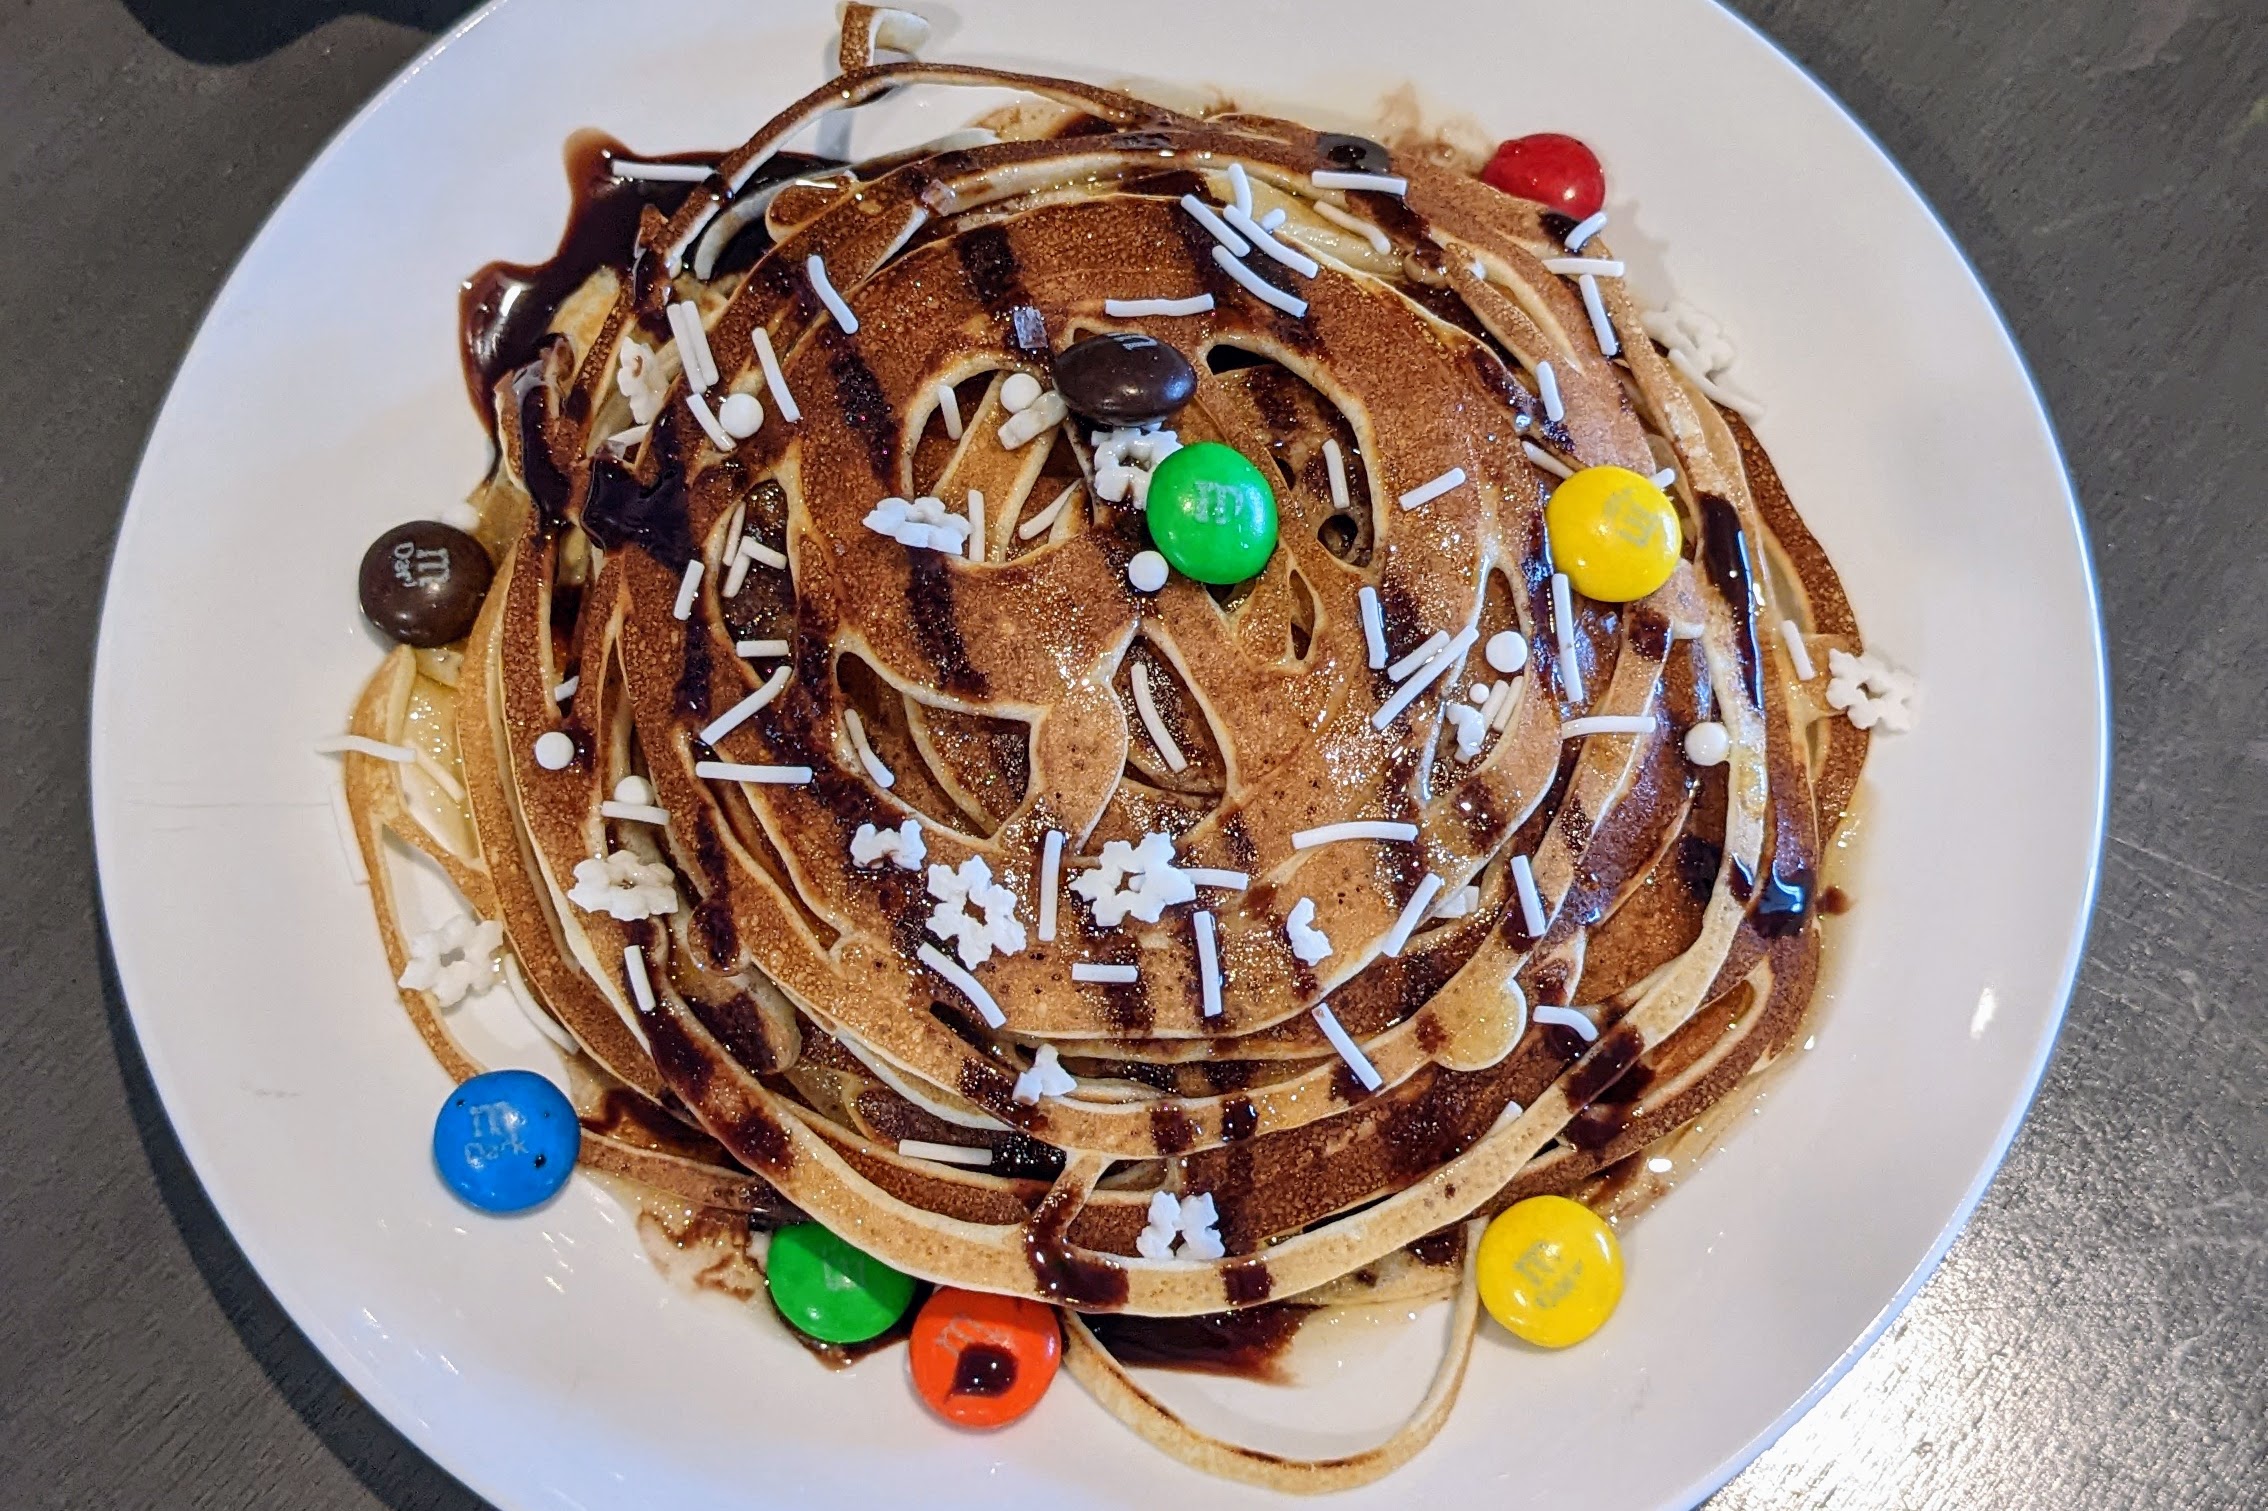
    Normally, I’m all for pasta in its various forms…but I can’t get behind Buddy’s breakfast spaghetti in Elf. However, the recent pancake spaghetti and pancake cereal trends got me thinking: What if you used flapjack batter as the base instead?

    stack of buddy the elf, squiggly pancakes with m&ms and chocolate syrup next to christmas tree mug
    Photos: Candace Braun Davison

    Using a resealable plastic bag with the corner snipped, I created squiggly pancakes that—when stacked up—look remarkably like spaghetti. Create a toppings bar for people to decorate their short stacks however they wish, and you’ve got a Buddy the Elf-worthy breakfast that’s perfect for a holiday party, Christmas morning or even a lazy Saturday that could use a little magic.

    (Pro tip: Amp up the supernatural vibes with a drizzle of Runamok Sparkle Syrup, which is regular maple syrup swirled with pearlescent mica.)

    Buddy Breakfast Pancakes Toppings Ideas:

    • Chocolate sauce
    • Sparkle syrup
    • Sprinkles
    • Mini marshmallows
    • Raspberries
    • Blueberries
    • Strawberries
    • Chopped bananas
    • Crumbled Oreos
    • Mini chocolate chips
    • M&M’s
    • Peanut butter (warm for 30 seconds to easily drizzle it)
    • Marshmallow creme
    • Crushed pretzels
    stack of buddy the elf-inspired pancakes beside a christmas tree mug, in front of a christmas tree

    Buddy the Elf-Inspired Breakfast Pancakes

    We aren't affiliated with 'Elf' or New Line Cinema; we're just fans producing pancakes for other fans to celebrate the film and the season.
    Prep Time 5 minutes
    Cook Time 15 minutes
    Total Time 20 minutes

    Equipment

    • 1 mixing bowl
    • 1 silicone spatula
    • 1 resealable plastic bag, sandwich or gallon size
    • 1 saute pan (at least 8 inches wide)
    • 1 spatula

    Ingredients
      

    • 1 batch pancake batter (from recipe or box mix)
    • 1/2 cup chocolate syrup
    • 1/2 cup sprinkles
    • 1/2 cup M&M's
    • 1/2 cup maple syrup

    Instructions
     

    • Prepare pancake batter according to the recipe or box instructions. (It should be a little thicker than buttermilk; runny enough that it's easy to squeeze out of the resealable bag.) Pour it in batches into a resealable plastic bag, adding only about a cup at a time so it's easy to draw with.
    • Add butter or cooking spray to the bottom of the sauté pan. Heat over medium-low heat. Once warmed, snip the corner of the resealable bag and use it to draw a squiggly spiral onto the pan.
    • Once a lip forms around the edge of the pancake and bubbles appear in the batter (around 1 minute), carefully flip and continue cooking until lightly golden on both sides.
    • Top however you wish. We used a handful of sprinkles and M&M's on each, as well as a drizzle of chocolate syrup and maple syrup to top things off. Serve immediately.

    We aren’t affiliated with Elf or New Line Cinema; we’re just fans producing pancakes for other fans to celebrate the film and the season.

    This post contains affiliate links, and purchases made through those links help fund Life Between Weekends.

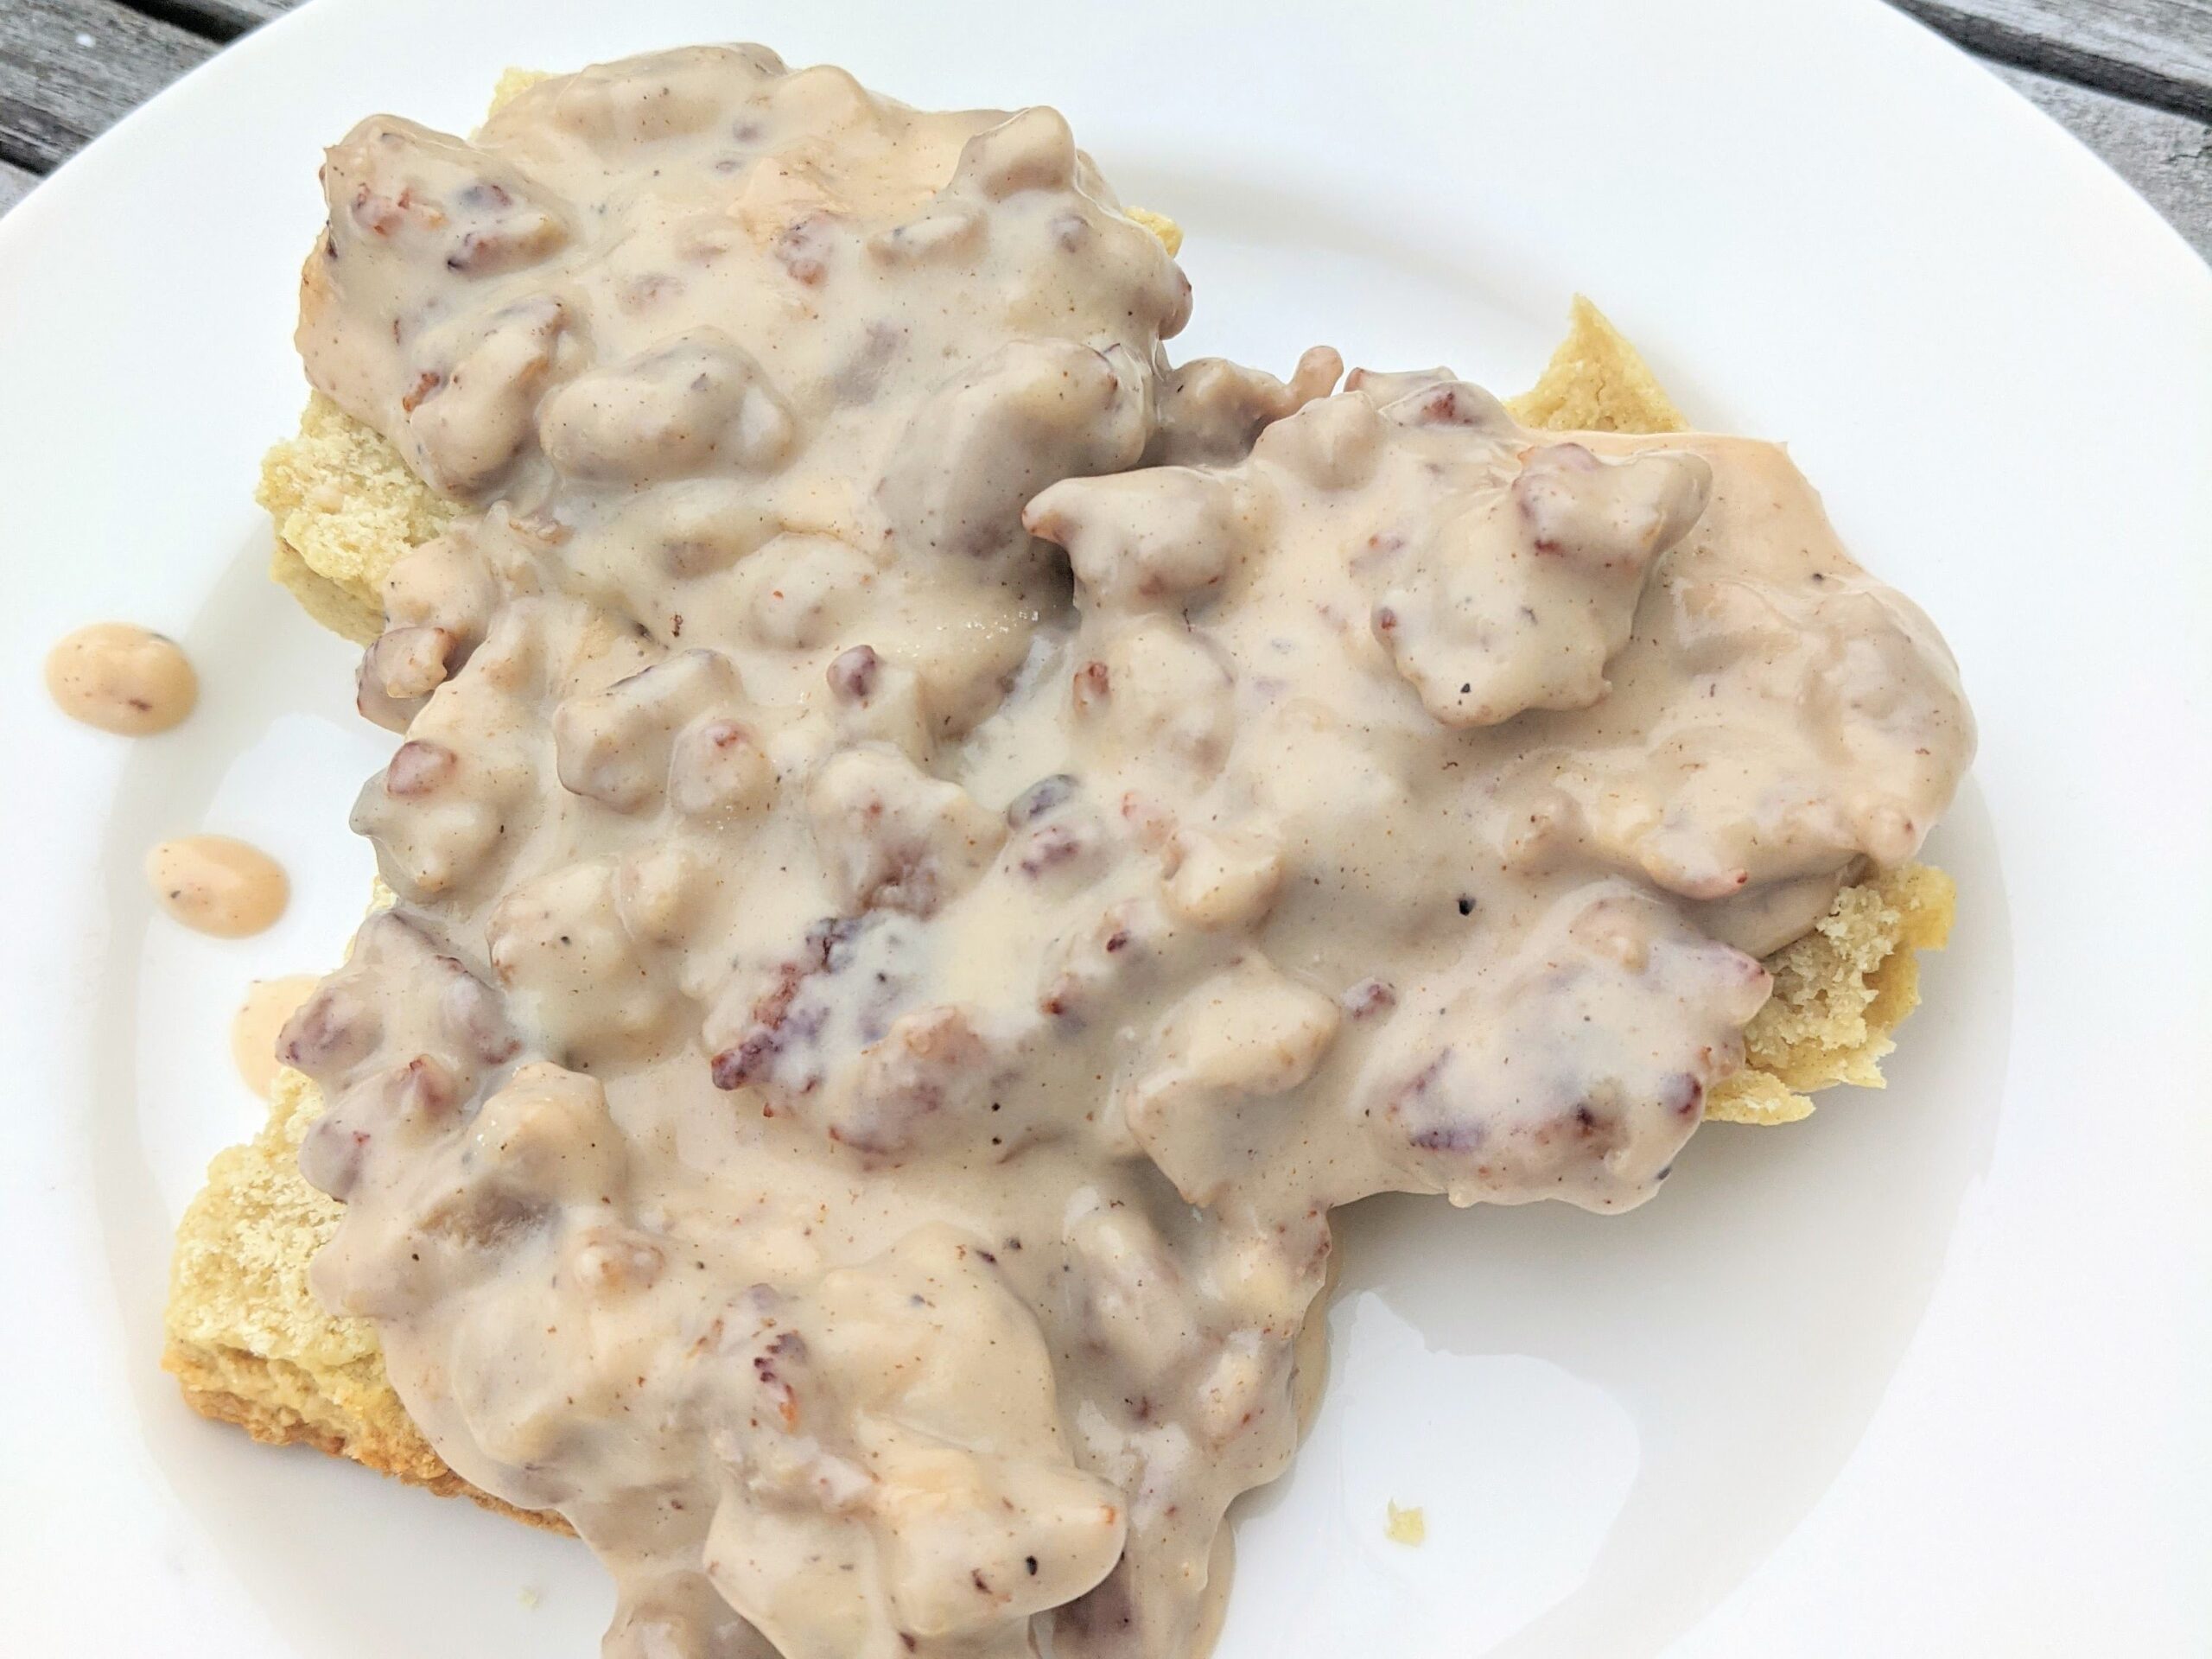
  • What to Serve with Biscuits and Gravy

    What to Serve with Biscuits and Gravy

    One of my mom’s specialties growing up was biscuits and gravy. (My mom’s recipe is a riff on Pioneer Woman’s, with extra Jimmy Dean sausage.) Whether they’re made from scratch or aided with a few shortcuts—hey, Pillsbury Grands are pretty good—the Southern staple is the kind of soul-satisfying meal that’s so hearty you can skip lunch. Or at least second breakfast.

    Because it’s so filling, it can easily bog you down, and it feels like it needs a little something alongside it to round out brunch. But if you’re anything like me, figuring out what to serve with biscuits and gravy can be a little challenging: What complements the creamy, salty, smoky gravy and fluffy pile o’ carbs? Here are some of my top picks.

    1. Fresh orange slices (or any fresh fruit, honestly)
    2. Fruit salad
    3. Over medium eggs
    4. Roasted asparagus (follow steps one and two for the asparagus alone, but if you want to go all out, take on Ina Garten’s entire recipe and include scrambled eggs. Now, it’s brunch.)
    5. Air fryer home fries (less oil, still crispy)
    6. Bacon & eggs breakfast salad (egg topping optional; the tangy vinaigrette helps cut through the heaviness of the gravy)
    7. Brussels sprouts hash
    8. Sweet potato hash browns (bonus points if they’re crisped in a waffle iron, like this recipe)
    9. Omelettes
    10. Soft-scrambled eggs (Bobby Flay’s tips are legit, if you like fluffy eggs)
    11. Cheese grits (perfect for particularly frigid days; you won’t need lunch!)
    12. Cauliflower grits (you know, in case you want to feel semi-virtuous)
    13. Maple-glazed bacon
    14. Roasted tomatoes
    15. Country ham
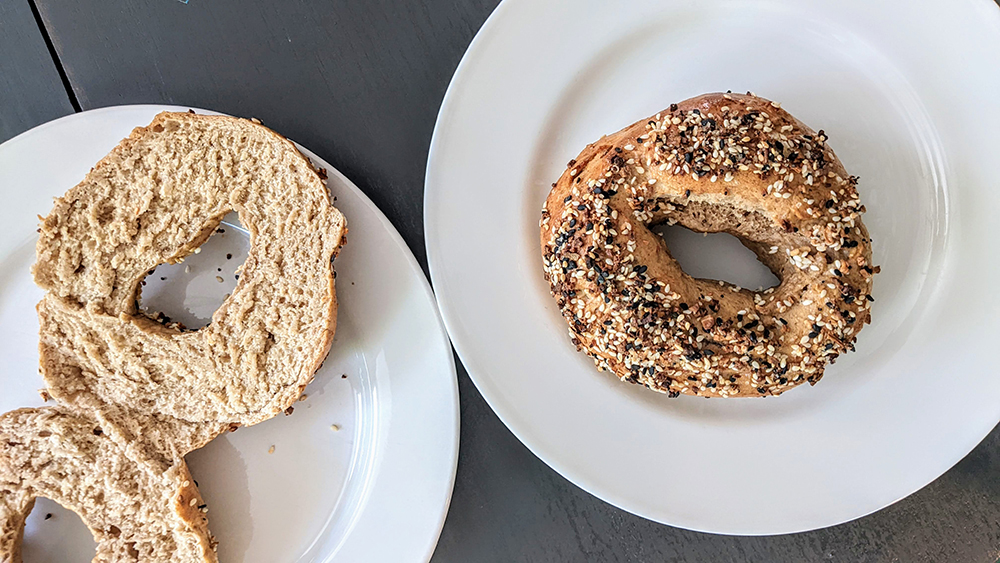
  • Rye Flour Everything Bagels

    Rye Flour Everything Bagels

    If you like the flavor of rye or pumpernickel bread, you’re going to love this riff on an everything bagel. It’s just as chewy and pillowy as a regular bagel, only it takes advantage of some of the health benefits of rye flour (like a boost of fiber and vitamin B, with less of a blood sugar spike). You can find it in the flour section of health food stores, or order some on Amazon.

    This recipe calls for starter dough, but don’t freak out—it’s not as complicated as you might think. Plus, since it uses instant yeast, there’s less concern about having the exact right temperature to get things going. BUT! Since the starter dough needs to rest for at least four hours before you proceed to the second step, I recommend whipping together the starter the night before, then finishing the bagels in the morning. (While you’re at it, it’s worth making some bacon scallion cream cheese the night before too, giving the flavors plenty of time to meld.)

    Note: This recipe calls for a mix of all-purpose flour and rye flour. Since rye flour contains very little gluten, a little AP flour was necessary to preserve the bagels’ texture. The rye flavor still comes through, albeit not as intensely as straight-up rye bread.

    Want less of a time commitment? Try Greek Yogurt Everything Bagels instead.

    Rye Flour Everything Bagels

    Recipe adapted from King Arthur Flour's Ultimate Sandwich Bagels
    Prep Time 30 minutes
    Cook Time 22 minutes
    Total Time 6 hours 52 minutes
    Course Breakfast
    Cuisine American
    Servings 4

    Ingredients
      

    Starter Dough

    • 1 c all-purpose flour
    • 1/8 tsp salt
    • 1/16 tsp instant yeast
    • 1/3 c water, cool

    Dough

    • starter dough
    • 3/4 c water, room temperature
    • 2 tsp barley malt syrup (or honey)
    • 3/4 tsp instant yeast
    • 1 1/4 tsp salt
    • 1 1/2 c rye flour
    • 1 c all-purpose flour

    Water Bath

    • 6 c water
    • 2 tbsp barley malt syrup (or honey)

    Everything Bagel Topping

    • 1 egg, beaten
    • 1/3 c Everything Bagel seasoning

    Instructions
     

    • Make the Starter: In a medium-sized mixing bowl, combine starter ingredients. Cover and rest at least 4 hours, or overnight.
    • Make the Dough: Add remaining dough ingredients to the starter. Knead about 10 minutes, or until the dough is very elastic and easy to stretch. Cover and let rise until it has grown about 50 percent larger in size, about 2 hours.
    • Lightly flour tabletop. Divide dough into four pieces and roll into balls roughly the size of your fist. Preheat oven to 450 degrees F.
    • Prepare the Water Bath: In a large saucepan, add water and barley malt syrup (or honey). Bring to a gentle boil. Place 1 to 2 bagels into the water bath, depending on how many fit. Boil for 60 seconds, using a spatula or tongs to gently flip the bagels, boiling the other side for 60 seconds. Place each one on a parchment-lined baking sheet.
    • Top the Bagels: Brush each bagel with egg wash and sprinkle liberally with everything bagel seasoning. Bake for 20 to 22 minutes, or until they're a light golden brown. Let cool for a few minutes before slicing and serving.
    Keyword bagels
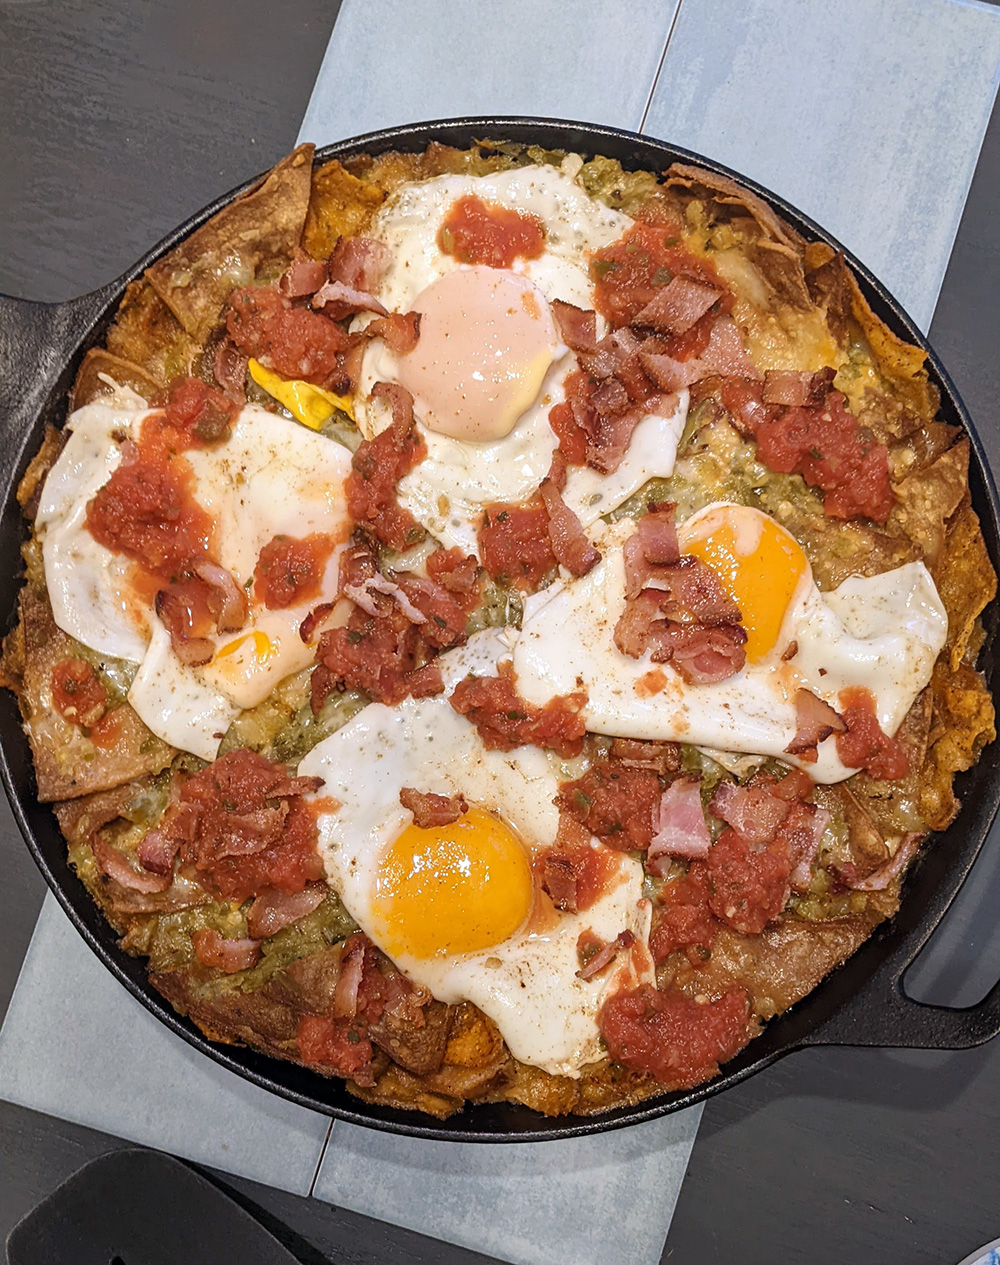
  • Easy Chilaquiles (Using Store-Bought Salsa)

    Easy Chilaquiles (Using Store-Bought Salsa)

    Let’s get this out of the way: This recipe isn’t for authentic chilaquiles; I’m not going to pretend like I have any authority in that space, beyond a strong appreciation for the classic Mexican breakfast. (Mexico in My Kitchen and Muy Delish feature great recipes on that front.) I call this my “wannabe Chilaquiles” recipe, simply because it involves a bunch of shortcuts, and it’s gradually become my go-to on busy weekends (or breakfast-for-dinner nights).

    You can use store-bought tortilla chips or chop and bake—or fry—corn tortillas. I like making baked chips, just because it’s a time-saver and tends to be less salty than store-bought. Modify based on what works for you!

    easy chilaquiles recipe using store-bought salsa

    Wannabe Chilaquiles

    It may not be authentic, but it's delicious (and involves plenty of shortcuts, so you can cook quickly).
    Prep Time 5 minutes
    Cook Time 20 minutes
    Total Time 25 minutes
    Course Breakfast
    Cuisine American, Mexican

    Equipment

    • 1 medium-sized saucepan
    • 1 wooden or silicone spoon
    • 1 cast iron skillet
    • 1 saute pan
    • 1 spatula

    Ingredients
      

    • 10 small corn tortillas
    • 1 3/4 c low-sodium chicken broth
    • 1 16-ounce container salsa verde
    • 1/4 c water
    • 3/4 c shredded Mexican cheese
    • 3 strips bacon
    • 4 eggs
    • 2 tbsp chopped cilantro
    • 1 avocado, sliced (optional)

    Instructions
     

    • Preheat the oven to 350 degrees F. Slice corn tortillas into triangles, arrange on a baking sheet and cook 5 to 6 minutes, rotate, and cook another 5 to 6 minutes, or until lightly golden and crisp.
    • As the chips bake, bring chicken broth, three-quarters of the jar of salsa and water to a boil, stirring occasionally, for 2 minutes. Add half of the shredded cheese and stir, cooking an additional minute to let the sauce thicken a bit. (It will look a little gritty; that's okay.)
    • Reduce oven to 325 degrees F. Pour chips into the skillet. Top with salsa mixture, saturating chips entirely. Top with remaining cheese and bake for 8 to 9 minutes, or until the chips have absorbed the sauce and the cheese is melted and bubbly. Remove from heat and turn off oven.
    • As the skillet bakes, fry bacon until crispy. Set on a paper towel-lined plate to cool. Use the remaining bacon grease to fry eggs, two at a time, until the whites are set but the yolks are still runny.
    • Sprinkle the bacon on the cooked chip mixture. Add eggs, then garnish with remaining salsa and cilantro. Top with avocado slices, if desired, and serve.
  • The Best Bagel Schmear Recipe: Bacon Scallion Cream Cheese

    The Best Bagel Schmear Recipe: Bacon Scallion Cream Cheese

    It’s bold to call this the best bagel schmear, but we’re going there. For five years, Nate and I had Brooklyn Bagel at least once a week, and our order rarely changed: everything bagel, toasted, slathered and stacked with bacon scallion cream cheese. Since moving away, we haven’t just endeavored to replicate the epic bagels; we’re all about the cream cheese too. Thankfully, that’s been a little easier to replicate. Here’s our go-to recipe for making bacon scallion cream cheese at home.

    Pro tip: Make this cream cheese the night before you plan on using it—and perhaps whip up a double batch—so the smoky, salty bacon and tangy kick of the scallions can infuse the schmear. Or at least whip it up before you start making your Greek yogurt bagels (you are making ’em, right?!). That’ll buy you at least 30 minutes of meld time.

    Brooklyn Bagel's Everything Bagel

    Bacon Scallion Cream Cheese

    An epic (and epically easy) schmear for your bagels
    Prep Time 5 minutes
    Total Time 5 minutes
    Course Breakfast
    Cuisine American
    Servings 4 bagels

    Equipment

    • 1 small mixing bowl
    • 1 silicone spatula

    Ingredients
      

    • 1 (8-ounce) block cream cheese, softened
    • 1/3 cup thinly sliced scallions
    • 4 strips cooked, crumbled bacon

    Instructions
     

    • In a small mixing bowl, combine cream cheese, scallions and bacon. Store in the refrigerator until ready to serve. (NOTE: This dish tastes better after the flavors have had time to meld, so it's great to make the night before—or at least 30 minutes before slicing and toasting your bagels.)
    Keyword bagels, breakfast, cream cheese, schmear
  • Ridiculously Easy Greek Yogurt Everything Bagels (& Asiago, Too!)

    Ridiculously Easy Greek Yogurt Everything Bagels (& Asiago, Too!)

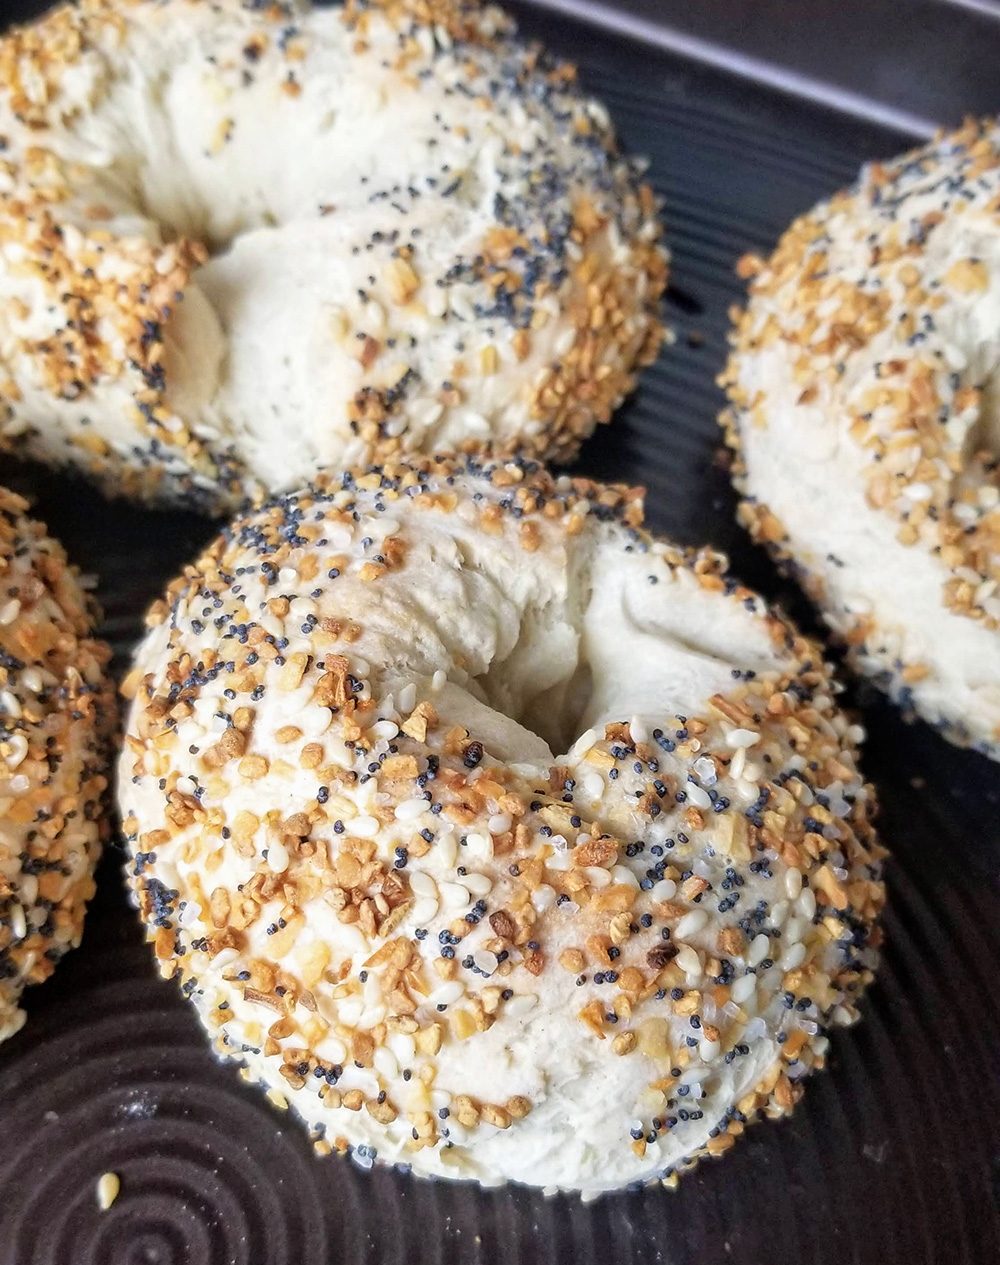
    Ever since moving out of New York City, I’ve been on the hunt for a bagel that can rival the best ones I’ve ever had: the poppy-garlic-dried-onion-smothered balls of carby wonder at Brooklyn Bagel. No place has come close, so I’ve set out to make my own. This Greek Yogurt Everything Bagel recipe has the heft and pillowy texture of BB—although it’s not quite as chewy—but I love it because it takes hardly any time to whip up.

    Brooklyn Bagel's Everything Bagel
    Brooklyn Bagel’s Everything Bagel (Photo: Candace Braun Davison)

    No fussing with yeast, no letting it rest, hardly any kneading—with just a few ingredients (many you probably have in your pantry), you can have an excellent weekend brunch. Just be sure to whip up an infused schmear to go with it. After all, if you’re going to go all out, you might as well opt for the bacon scallion cream cheese too, right?!

    If you want to make Greek Yogurt Asiago Bagels, simply sub the everything bagel seasoning for an equal amount of shredded cheese. (Or heck, go wild and opt for a half cup! We support it.) Instead of dipping it, we’ve found it’s easier to sprinkle the tops of the bagel.

    greek yogurt everything bagels

    Greek Yogurt Everything Bagels

    Not into everything bagels? Feel free to substitute any toppings you desire (Shredded Asiago cheese is also popular around here!)
    Prep Time 10 minutes
    Cook Time 25 minutes
    Total Time 35 minutes
    Course Breakfast
    Servings 6

    Ingredients
      

    • 2 cups all-purpose flour
    • 1 heaping tbsp baking powder
    • 2 tsp salt
    • 2 cups Greek yogurt
    • 1 egg
    • 1 tsp water
    • 1/3 cup everything bagel seasoning (or shredded Asiago cheese)

    Instructions
     

    • Preheat oven to 375 degrees F. As it heats, grab a medium-sized bowl and combine the flour, baking powder and salt. Add yogurt, stirring until a craggy dough forms.
    • Lightly flour a clean countertop or work surface. Add the dough, kneading it about a dozen times, just to form a somewhat sticky ball. Divide it into six balls. Use your fingers to form a half dollar-sized hole in the center of each one.
    • In a small bowl, crack egg and add water. Beat together until combined. Brush the egg wash on one side of each bagel.
    • In a shallow plate or bowl, add everything bagel seasoning. Dip each bagel egg wash-side down into the seasoning. Flip, brush the other side with egg wash, and dip that side too, so the whole thing is covered.
    • Place bagels on a parchment-lined baking sheet about 2 inches apart. Bake for 20 to 25 minutes, or until the bagels are lightly golden and no longer gooey or jiggly. Cool before slicing and schmearing.
    Keyword bagels
  • Pastelitos, aka the Best Super Bowl Dessert for Buccaneers Fans

    Pastelitos, aka the Best Super Bowl Dessert for Buccaneers Fans

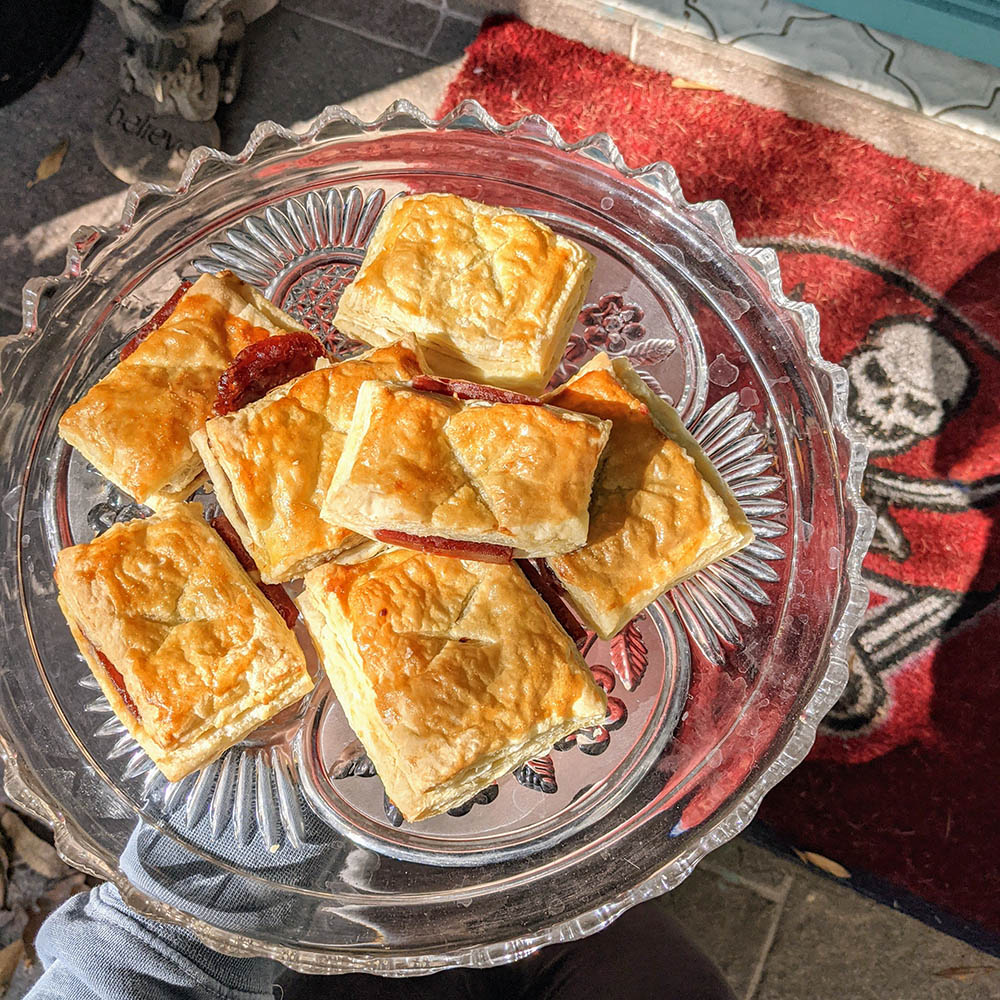
    Certain foods are synonymous with Tampa Bay: Cubanos, Bloomin’ Onions (Tampa is the birthplace of Outback, after all), grouper sandwiches, strawberry shortcake straight from Plant City. They’re must-haves when you’re in the Bay, but there’s one treat that doesn’t get nearly enough attention, and it really, truly should. I’m talking about pastelitos de guayaba y queso. These flaky hand pies are oozing with guava and cream cheese, which first-timers have described as “a cross between a cranberry-fig pie and a cheese Danish.”

    It’s a traditional Cuban dessert, reflective of the vibrant Cuban culture that infuses Ybor City and the surrounding Tampa Bay area. And if you’ve grown up in Hillsborough or Pinellas County, it’s a treat that tastes like home. So, in honor of Tampa Bay hosting the Super Bowl this year—and the Buccaneers making it to the big game, the first in the NFL to enjoy such a home-field advantage—I wanted to try my hand at making them.

    This six-ingredient recipe is a simplified take on pastelitos, based on a combination of how friends have made them and a little internet research. I added a little lemon and sugar to make the filling a bit more cheesecake-y, though many recipes I saw online while researching the dessert called for spreading straight cream cheese on the pastry. Riff on this however you please!

    Next time, I might try sprinkling coarse sugar on top of the pastry, post-egg wash, just to add a little crunch (and sweetness).

    guava and cream cheese pastelitos

    Guava and Cream Cheese Pastelitos

    These easy guava and cream cheese pastries pay homage to the Cuban pastelitos sold in Ybor City in Tampa Bay.
    Prep Time 10 minutes
    Cook Time 20 minutes
    Total Time 30 minutes
    Course Dessert
    Cuisine Cuban
    Servings 12

    Equipment

    • Oven
    • Baking sheet
    • Mixer

    Ingredients
      

    • 1 (8-ounce) package cream cheese, softened
    • 1/2 lemon
    • 1 tbsp sugar
    • 1 (17.3-ounce) package frozen puff pastry, thawed two sheets total
    • 1 (14.1-ounce) package guava paste
    • 1 egg, beaten

    Instructions
     

    • Preheat oven to 400 degrees F.
    • In a mixing bowl or the bowl of a stand mixer, combine cream cheese, the juice of the lemon half and sugar. Beat to combine, about 1 minute.
    • Spread out one sheet of thawed puff pastry on a parchment-lined baking sheet. Slather the cream cheese mixture on the puff pastry.
    • Slice guava into quarter-inch pieces. Cover the cream cheese-topped puff pastry with pieces of guava paste. Top with the other sheet of puff pastry, creating what looks like a massive puff pastry sandwich. Cut into 12 squares. Score the tops of each square with an X (or any design of your choice).
    • In a small bowl, crack an egg and beat it until pale yellow. Brush the top of the puff pastries with the egg wash. Bake for 20 minutes, or until the tops are golden brown.
    Keyword cream cheese, guava, pastelitos, pastry, puff pastry
  • How to Make Fruity Pebbles Pancakes

    How to Make Fruity Pebbles Pancakes

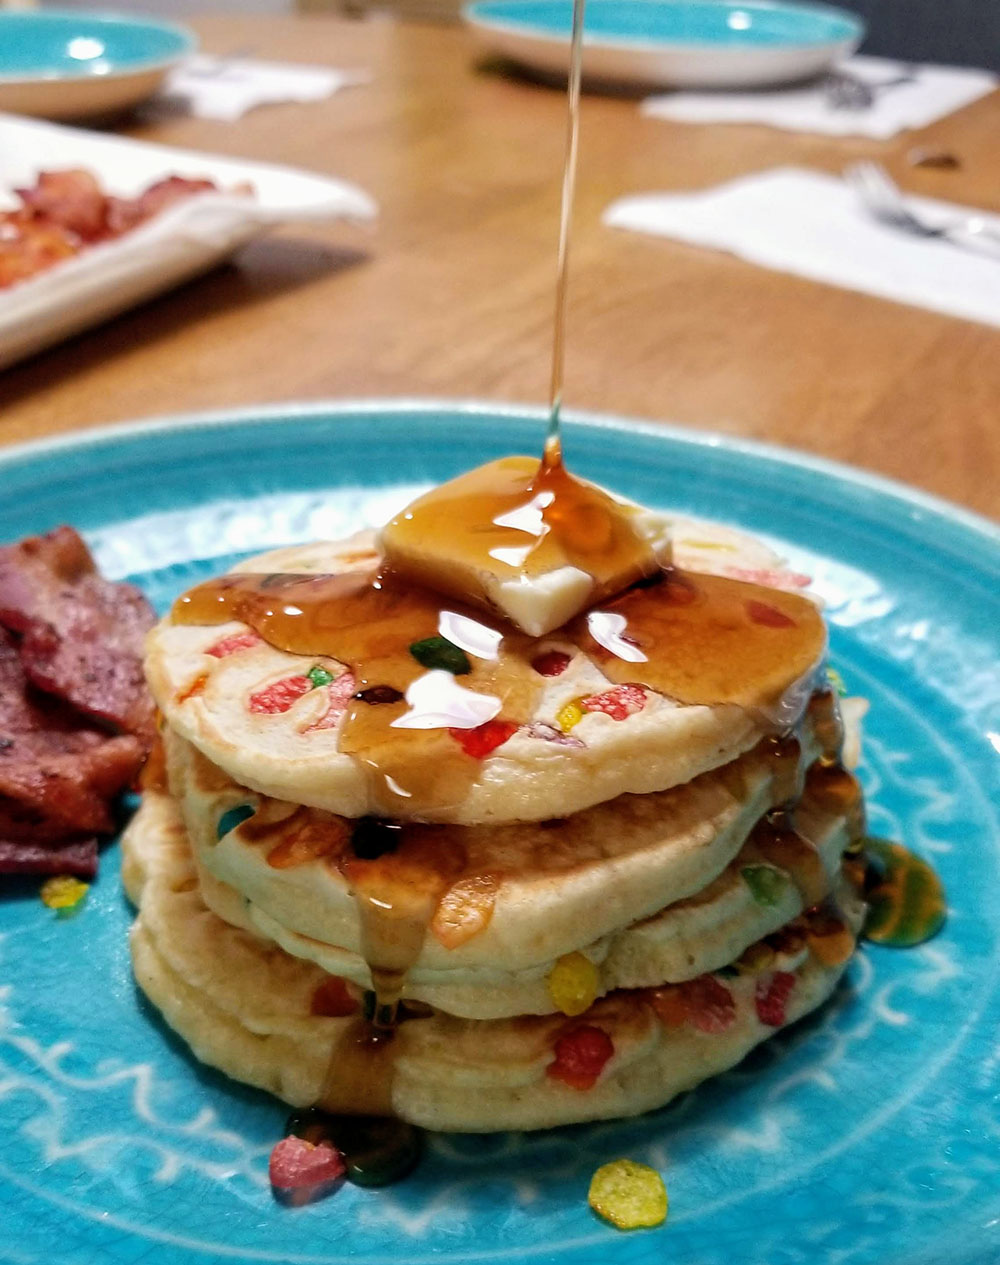
    You could use a little moment of levity in your day. We all could. And there’s something undeniably gleeful about staring at a shortstack of flapjacks studded with rainbow cereal. These Fruity Pebbles pancakes are so easy to make that you have no excuse not to try them, really, so give it a go and let me know what you think.

    Easy Fruity Pebbles Pancakes Recipe
    You could cook them a bit more, so they’re more golden brown, but as long as the center is cooked, you’re a-okay.

    If you really want to infuse this breakfast with even more Fruity Pebbles flavor, you could finely crush a handful of cereal, steeping it in the wet ingredients beforehand, though that might turn your batter a grayish color. Personally, I like the slight touch of sweetness and crunch you get from adding in the cereal just after pouring a pancake on the griddle.

    Fruity Pebbles pancakes recipe

    Fruity Pebbles Pancakes

    These are in no way endorsed by Fruity Pebbles or Post, but they're so good they should be. Just sayin'.
    Prep Time 10 minutes
    Cook Time 15 minutes
    Total Time 25 minutes
    Course Breakfast
    Cuisine American
    Servings 4

    Equipment

    • nonstick pan
    • spatula
    • measuring cups

    Ingredients
      

    • 2 tbsp butter, plus more for serving
    • 1 1/2 c all-purpose flour
    • 2 tbsp sugar
    • 1 tbsp baking powder
    • 1/2 tsp salt
    • 2 eggs room temperature
    • 1 1/4 c milk
    • 1 tsp vanilla extract
    • 1 c Fruity Pebbles cereal
    • maple syrup, for serving

    Instructions
     

    • Divide the butter into 2 tbsp and 1 tbsp. The single tbsp will be used to grease the skillet in a bit. Place the remaining 2 tbsp butter in a small, microwave-safe bowl and microwave in 20-second intervals, stirring in between, until melted. Set aside. (You'll use it later, but we want to give it time to cool a little before adding it to the batter.)
    • In a large mixing bowl, combine flour, sugar, baking powder and salt.
    • In a smaller bowl, crack the eggs, whisking them gently. Add milk and vanilla extract, stirring until combined. Add to the flour mixture, along with the butter. (Make sure the butter isn't hot; if so, it can start to cook the eggs.) Mix everything until a thick batter has formed, using your spoon to break up any large clumps.
    • Bust out that remaining tbsp of butter! Melt it in a nonstick pan over a burner set to medium heat. Once melted, pour about 1/4 cup of pancake batter onto the pan. Sprinkle the batter with Fruity Pebbles cereal. Cook until bubbles start to form in the batter and the underside of the pancake turns lightly golden, about 2 to 2 1/2 minutes. Flip and cook the other side until lightly golden, about 1 to 2 more minutes. Top with additional butter and maple syrup before serving, if desired.
    Easy Fruity Pebbles Pancakes, cooked and plated

    Psst…as you may have noticed, this recipe is pretty simple: You’re just adding Fruity Pebbles to pancake batter like you would chocolate chips, blueberries or bananas. So keep it on hand as a base to use for whatever pancakes you’re in the mood for, and just swap out your mix-ins as desired.

    Conversely, if you’re serious about the slightly tangy flavor and extra fluffiness you get from buttermilk flapjacks, go ahead and use your go-to recipe. These Fruity Pebbles pancakes get their lift from baking powder, and I tend to favor this version simply because I never keep buttermilk on hand–and I don’t love waiting around to make my own. You do you!

Optimized with PageSpeed Ninja