Category: Pop Culture Recipes

Pop culture-inspired desserts, snacks and drinks you need to see to believe

  • A ‘Wicked’-Inspired Dessert: Chocolate Pistachio Candy Bars

    A ‘Wicked’-Inspired Dessert: Chocolate Pistachio Candy Bars

    Jump to Recipe

    Popular! You’re gonna be popular—when you pregame for the Nov. 22nd premiere of Wicked with a batch of these pistachio-crunch-filled chocolate orbs. (C’mon, you know I had to go there.) After seeing all of the buzz—and every collab known to man, one-upping 2023’s Barbie blitz—I had to make a treat inspired by the Broadway play-turned-two-part-movie.

    When I started thinking about Wicked-inspired desserts, my mind immediately turned to all things green. And how my Instagram and TikTok feeds were full of riffs on “Can’t Get Knafeh of It,” the pistachio-cream-and-kataifi-filled candy bar from Dubai’s Fix Dessert Chocolatier (learn more about it—and the inspiring creator—here). As the bar, which oozes a crispy, pale green filling, grew in popularity, it became known as the “viral Dubai chocolate bar,” with people making their own twists on it and stores hawking imported versions (which are disputed as to their authenticity) for $20 apop.

    I won’t be going to Dubai anytime soon, but I can get myself to a movie theater (provided I can find a babysitter). And you better believe I can make half-sized chocolate bars in my own home.

    wicked dessert idea: chocolate pistachio candy bars, featuring pink and green stripes
    Photos: Candace Braun Davison

    Here’s the recipe, and under it, I’ve answered some of the top questions I received when I had people try it (from “where do you buy pistachio butter?” to “What other fillings could I use?”).

    Now, onto our Wicked-inspired dessert! Here’s the recipe:

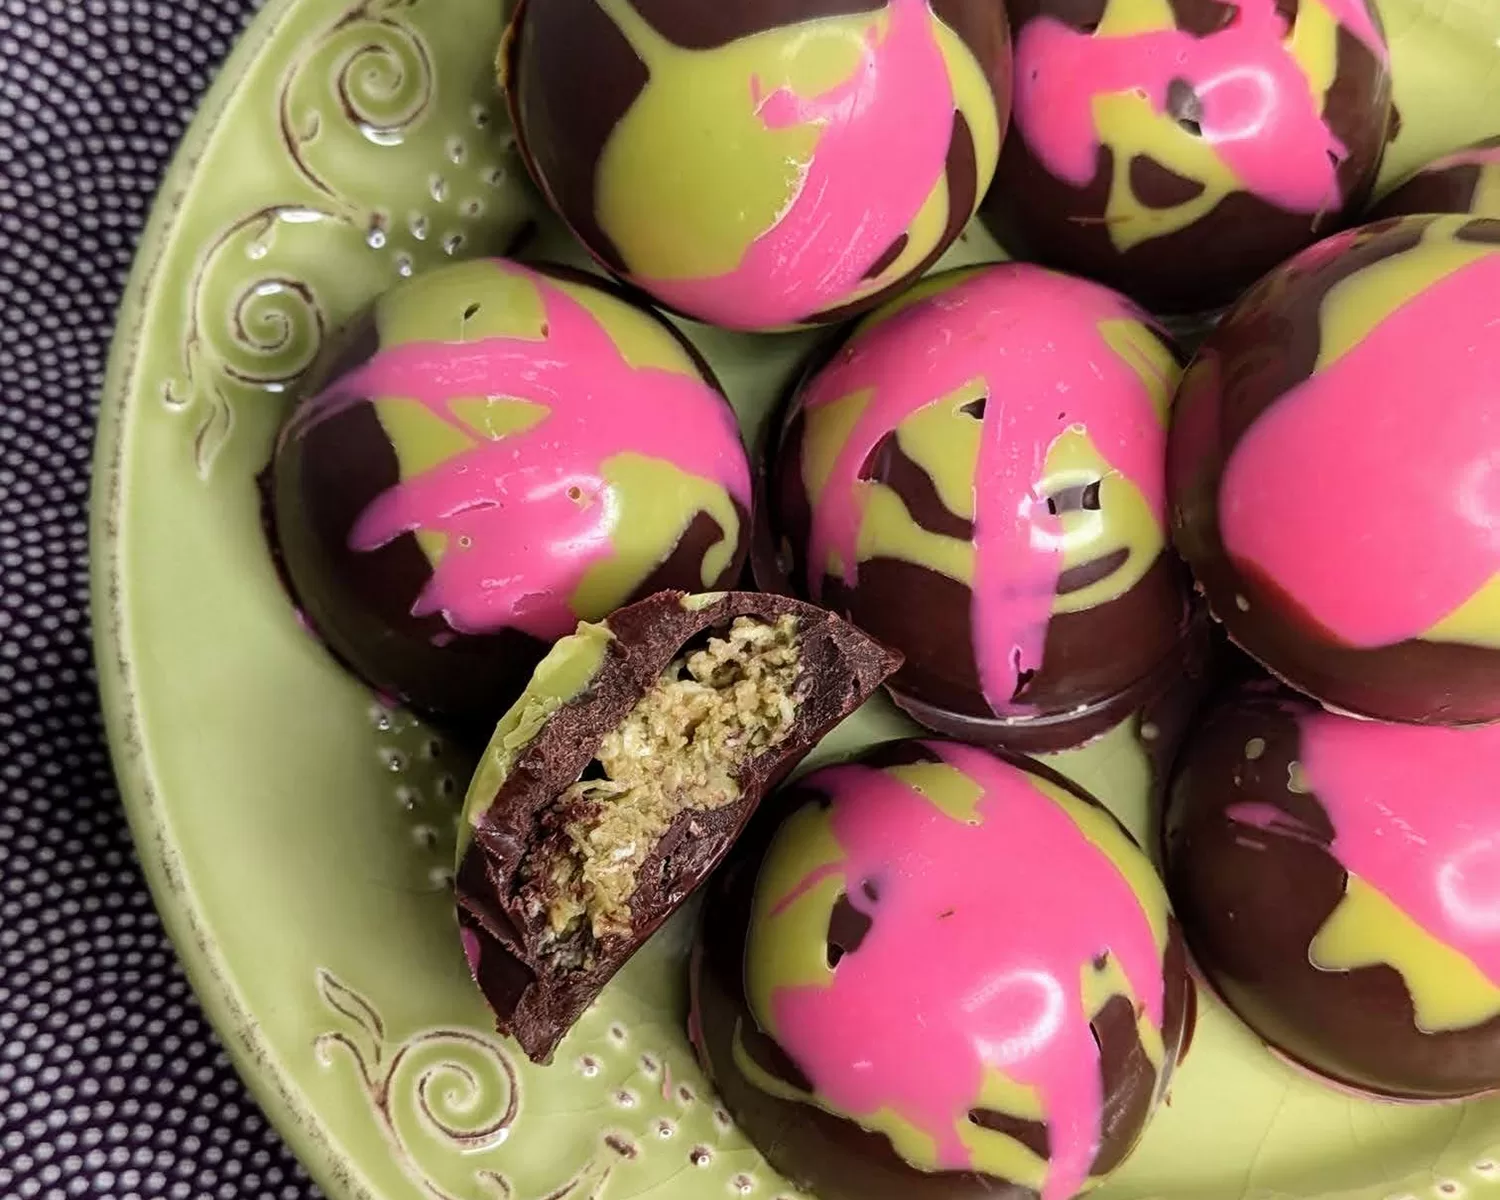
    wicked dessert idea: chocolate pistachio bars in sphere shape

    Wicked-Inspired Chocolate Pistachio Orbs

    These pistachio-tahini crunch bars are inspired by the viral Dubai chocolate bar from Fix Dessert Chocolatier—and the upcoming 'Wicked' movie. What's not to love?
    Prep Time 15 minutes
    Cook Time 3 minutes
    Chill Time 20 minutes
    Total Time 38 minutes
    Course Dessert
    Servings 12

    Ingredients
      

    • 2 tbsp green candy melts
    • 2 tbsp pink candy melts
    • 2 cups semisweet chocolate chips
    • 1 tbsp canola oil
    • 1 cup shredded mini wheat
    • 2 tsp tahini
    • 3/4 cup pistachio butter

    Instructions
     

    • Place the green and pink candy melts in their own small, microwave-safe bowls. Microwave each in 25-second intervals, stirring in between, until fully melted.
    • Use a spoon to drizzle the pink and green candy melts inside the cups of a spherical mold. Set aside.
    • In a medium-sized, microwave-safe bowl, place chocolate chips and canola/vegetable oil. MIcrowave in 25-second intervals, stirring in between, until fully melted. It should be about as runny as pancake batter. If it seems really thick, add a teaspoon of canola oil and warm for 25 seconds more, mixing afterward, to help thin it out.
    • Brush the melted chocolate inside the molds of the sphere, over the candy melt drizzle. Once you have an even layer, set it aside in the fridge to harden. (This should take at least 15 minutes.) Set aside remaining chocolate for now.
    • Make the filling: Pour the shredded mini wheat into a gallon-sized resealable bag. Get out any excess air and seal shut, then use a rolling pin or wooden spoon to smash the mini wheats to tiny bits. (You could also use a high-powered blender or food processor.) Pour it into a large mixing bowl. Add tahini and pistachio butter, stirring to combine.
    • Place the pistachio mixture in each spherical mold, filling it about 3/4 of the way up.
    • Melt remaining chocolate in the microwave. Use it to cover the filling in an even layer in each mold. Place the mold in the fridge for at least 20 minutes to set before popping them out and serving.
    Keyword chocolate chips, pistachio

    All Your ‘Wicked’ Dessert FAQs, Answered

    What Do These Chocolate Pistachio Candy Bars Taste Like?

    Imagine the crispity crackle of a Crunch bar, only with a richer, semisweet chocolate base and a slight pistachio-tahini flavor. The core is a bit gooey, but not runny by any means. It’s more like a crunchy chocolate bar, in my opinion.

    wicked dessert idea: chocolate pistachio bars being made, showing the pistachio crunch filling

    What Do You Fill It With?

    If you’re trying to get as close to the texture and flavor of “Can’t Get Knafeh of It,” you’ll want to use a mix of pistachio butter, tahini (adding a nutty, savory note) and kataifi, a shredded phyllo pastry dough. Kataifi can be hard to come by—I tried six grocery and specialty stores, to no avail—and online retailers have boasted some pretty inflated prices as the dessert has become more popular.

    For an affordable sub that offers similar crunch, try taking shredded mini wheats, popping them in a resealable bag and smashing them to bits. They’ll be a smidge sweeter, thanks to their powdered sugar coating, but they offer a comparable texture. (That’s what I used in this recipe.)

    Where Did You Find Pistachio Butter? What about Kataifi?

    While I use shredded mini wheats in this recipe, I eventually found (and ordered) kataifi, pre-cooked, from Amazon. I bought pistachio butter at Walmart, since it was a bit better priced than other places I’d shopped.

    wicked dessert idea: chocolate pistachio bars in sphere shape with marshmallow filling

    Can I Fill It With Something Else?

    Absolutely. You could fill these Wicked-inspired chocolate bars with:

    • marshmallow creme (my daughter loved this!)
    • peanut butter
    • mini M&Ms
    • sprinkles
    • no-bake cheesecake filling

    How Do You Make Them into Orbs?

    Remember when hot cocoa bombs were all the rage? This is a great way to use that silicone mold again. (And if you didn’t hop on that bandwagon, did you even pandemic?! You can find them on Amazon and at most major craft and cake supply stores.)

    Note: I am not affiliated with Wicked or Universal Pictures in any way. I just created a Wicked-inspired dessert for other fans to enjoy as they get ready to see the movie in theaters this Nov. 22.

  • 57 Taylor Swift-Inspired Menu Ideas & Food Puns

    57 Taylor Swift-Inspired Menu Ideas & Food Puns

    Taylor Swift is everywhere these days, so why not let The Tortured Poets Department singer inspire your menu? Whether you’re rewatching the Eras concert tour movie, hosting a birthday party or bachelorette party for your favorite Swiftie, or want to rebrand a Chiefs (or Super Bowl) watch party, you might as well lean into things with a full lineup of appetizers, drinks and desserts featuring Taylor Swift-themed food puns.

    I started chronicling every Swift-related food I could think of after writing a story about hosting a Taylor Swift-inspired Super Bowl party for PureWow. And since I’m a sucker for a good theme party, I keep expanding this list with new dishes. (Taylor may churn out songs; I churn out…party snacks. Seriously. I got so into snack stadiums that I helped design six-foot-long ones, including one featured on Good Morning America. It’s a bit of a problem.)

    From lol-worthy to borderline cringe, here’s every ridiculous Taylor Swift-themed app, side, dessert, main and drink idea my friends and I could come up with (featuring ideas for every era, including The Tortured Poets Department). If there’s one I missed, DM me, and I’ll add it!

    58 Taylor Swift-Inspired Menu Ideas, Inspired by Her Every Era

    buffalo deviled eggs on wooden football-shaped board
    The Last Great American Deviled Eggs / Photo: Candace Braun Davison

    13 Taylor Swift-Inspired Appetizers & Sides

    1. The Torched Potatoes Department (c’mon, I had to)
    2. This Is Why We Can’t Have Spicy Wings
    3. I Bet You Think About Brie (AKA You Belong With Brie, AKA The Tortured Puff Pastry Department)
    4. I Knew You Were Truffle (Fries)
    5. Meat Me at Midnight Charcuterie
    6. All Too Well-Done Steaks (aka beef jerky)
    7. Tim McGuac
    8. Taylor Totchos
    9. The Last Great American Deviled Eggs (a stretch, OK?!)
    10. Vigilante Shishito Peppers
    11. You Belong with Me(atballs)
    12. But Daddy I Love Ham (and Cheese Pinwheels)
    13. Call It What You Wontons
    Buffalo chicken brie bites, cooked and drizzled with ranch
    I Bet You Think About Brie / You Brielong With Me / Buffalo Chicken Brie Bites / Photo: Candace Braun Davison

    11 Taylor Swift-Worthy Entrees

    1. Anti-Gyros
    2. Cornelia Beef Sliders
    3. Getaway Carbs
    4. You Need to Kabob Down
    5. Shawarma Is My Boyfriend
    6. Picture to Burger
    7. Now That We Don’t Taco
    8. Everything (Bagel) Has Changed (into bagel dogs, of course)
    9. Stay Stay Cheese-Stay-k
    10. I Know Pizzas
    11. Better Than Revenge Chili
    Lemon-Garlic Kale Salad, LifeBetweenWeekends.com
    Kale It What You Want Salad / Photo: Candace Braun Davison

    5 Taylor Swift Salad Puns

    1. You Need to Cobb Down (yes, we’re repeating song titles, but this is worth it)
    2. Caprese-r (Crazier? Get it? OK, OK, I’ll cobb down)
    3. Bad Balsamic (served with whatever salad you want)
    4. Kale It What You Want (Garlic-Parm Kale Salad)
    5. Clara Bow-Tie Pasta Salad
    How to make chocolate chip pancake cereal
    Photo: Candace Braun Davison

    6 Taylor Swift-Inspired Brunch Ideas

    1. Long Story Shortstacks
    2. Guilty as Cinnamon Rolls
    3. Fortnight French Toast Sticks
    4. Fresh Out the Scramble
    5. Call It Waffle You Want
    6. I Can Do It With a Breakfast Tart (bonus points if it’s a massive toaster pastry)
    Lavender Haze / Photo: Empress 1908 Gin

    11 Swift-Inspired Drink Ideas

    Psst: Many of these are boozy, so please drink responsibly and only make/serve if you’re 21 or older.

    1. Look What You Made Me Brew (beer cocktails)
    2. Bad Blood-y Marys
    3. Wildest Dreamsicles
    4. Lavender Hazes
    5. (Milk)Shake It Off
    6. White (Horse) Russians
    7. Champagne Problems Mimosas
    8. Starbucks Lovers Iced Coffee Bar
    9. Vogue-ka Diet Coke (Swift told Vogue this drink’s her fave back in 2016.)
    10. Fresh Out the (Tequila) Slammer
    11. So Long, London Fog
    pudgy cheesecake cookies
    Midnights Snacks Cookies / Photo: Candace Braun Davison

    11 Swift-Inspired Desserts

    1. Evers’mores Dip
    2. Donut Blame Me Bites
    3. Cruel Sundae
    4. Florida!!! Key Lime Pie Bites
    5. Eclair-a Bow
    6. Lovin’ You Was Red (Velvet Cupcakes)
    7. Midnights Snacks (Cookies, obvi)
    8. Selena + Chef Matcha Chocolate Chip Cookies (after all, the two besties constantly support each other)
    9. Sad Beautiful Tiramisu
    10. Welcome to New York-Style Cheesecake
    11. Literally Taylor Swift’s face on a cake

    Disclaimer: I’m not affiliated with Taylor Swift, Big Machine Records or even Big Cream Cheese, though all are certainly featured largely here. I’m just a fan, creating something fun for other fans.

  • How to Make Bingo & Bluey-Inspired Cupcakes at Home

    How to Make Bingo & Bluey-Inspired Cupcakes at Home

    Like our cultural obsession with Taylor Swift, there is no peak Bluey. The universe cannot get enough, though in my household, sometimes I wonder whether the adults love the show even more than the kids. (What else can make you laugh, then cry, then laugh again in 7 minutes flat?!) If your home’s under a similar spell, these Bingo- and Bluey-inspired cupcakes make for a fun rainy day activity—or edible arts and crafts project.

    They make for a great birthday party activity too—simply bake a batch of cupcakes in advance, along with a big batch of vanilla frosting that you color ahead of the party and separate into resealable sandwich bags. Then, you can give each kid a cupcake (or two) and let them share bags of frosting and go to town. Don’t like what you make? Eat it. Everybody wins. (Except for maybe the parents who take home sugared-up kids, particularly the Muffin Heeler at the party who guzzles frosting straight outta the bags. You know that’s going to happen.)

    Oh, and if you want to make one big Bluey-inspired cake instead, I’ve got a tutorial for that too.

    @candacebd

    Bingo & Bluey cupcakes: because the best crafts are ones you can eat. You’ll need: *vanilla frosting *gel food coloring *mini Hershey’s bars (optional, for the ears; frosting works too) *mini chocolate chips *chocolate cupcakes, baked and cooled Outlining the characters in blank frosting made a big difference in the end! #desserttiktok #blueytok #bingocake #blueycupcakes #birthdaypartyideas #blueyparty #kidscrafts #kidsbaking

    ♬ sonido original – bluey

    How to Make Bingo- and Bluey-Inspired Cupcakes

    You’ll need:

    • 1 batch of 18 cupcakes, baked and cooled
    • 6 cups buttercream or cream cheese frosting, homemade or store-bought
    • gel food coloring (red, yellow, blue, black)
    • mini chocolate chips (optional, for their noses)
    bluey and bingo inspired cupcakes in a cupcake tin, all homemade
    Photos: Candace Braun Davison

    Directions:

    1. Prep Your Colors

    For All Cupcakes:

    You need one base cupcake color (I chose pink, for contrast). One 16-ounce container (or 2 cups of homemade) should get the job done.

    Then, take one container (or 2 cups homemade frosting) and divide it into three bowls for Bingo & Bluey’s details:

    • White (plain vanilla/cream cheese frosting)
    • Light tan (mix in half a drop of yellow and a scant spoonful of the light-orange frosting, adding more until you have the shade you want)
    • Black (add black gel frosting, a drop at a time, until it’s as dark as you like it)

    Now, with that final 2 cups of frosting, you’ll set aside 5 bowls for Bingo’s orange-y coloring and Bluey’s blue tones.

    For Bingo cupcakes:

    • Light orange (start by mixing in 1 drop yellow, 1/2 drop red, adding gradually to achieve desired color)
    • Dark orange (start with 1 drop yellow, 1 drop red; add more if needed)

    For Bluey cupcakes:

    • Light blue (add a drop of blue gel coloring at a time, mixing until you have a pale sky blue)
    • Medium blue (add twice as much blue)
    • Dark blue (add the same amount as medium blue, then a drop of black)
    Make a Bluey-inspired Bingo cupcake by drawing a tan oval and orange ears

    2. Draw an arch in light orange (for Bingo) or light blue (for Bluey).

    Color it in. Then use dark orange (or dark blue) to draw two triangle ears on top, and two ovals for the patches around their eyes.

    How to make a bluey-inspired bingo cupcake: adding tan details for depth and define the snout

    4. Add a tan snout and a mini chocolate chip nose.

    (You can skip the chocolate chip and use black frosting if you want. There are no rules here!)

    adding white oval eyes and brows to the bingo-inspired cupcake

    5. Use white frosting for the stomach, eyes and brows for Bingo.

    For Bluey, use light blue for the brows/stomach.

    bingo cupcake tutorial: adding the eyes and smile with black frosting

    6. Draw in the eyes and smile in black frosting, then outline the whole thing.

    Cut the tiniest hole possible in your resealable bag of black frosting, or use a #2 Wilton piping tip, so it doesn’t come out blobby or blotchy.

    Feel free to riff on this; my 5-year-old daughter and I had a blast experimenting with the whole Heeler fam (before moving on to self-portraits and other designs). Next up, I’m making Muffin muffins!

    Editor’s Note: I’m not affiliated with Bluey/Disney+/BBC. I’m just a fan, sharing a tutorial for other parents looking to add a little joy to their kids’ day.

  • How to Make ‘Peppa Pig’-Inspired Cupcakes

    How to Make ‘Peppa Pig’-Inspired Cupcakes

    “She’s Peppa Pig! Peppa Pig! My name is Peppa Pig.” At some point, it seemed like every toddler I knew was addicted to the show about a cheeky little pig. But it turns out that Peppa Pig-inspired cupcakes aren’t just a treat for the under-four set. When I first made this simple dessert in 2020, I didn’t realize it’d take on a life of its own, becoming equally popular with my Gen Z friends (largely thanks to this viral scene)—and millennial parents in search of an easy birthday treat for their kids.

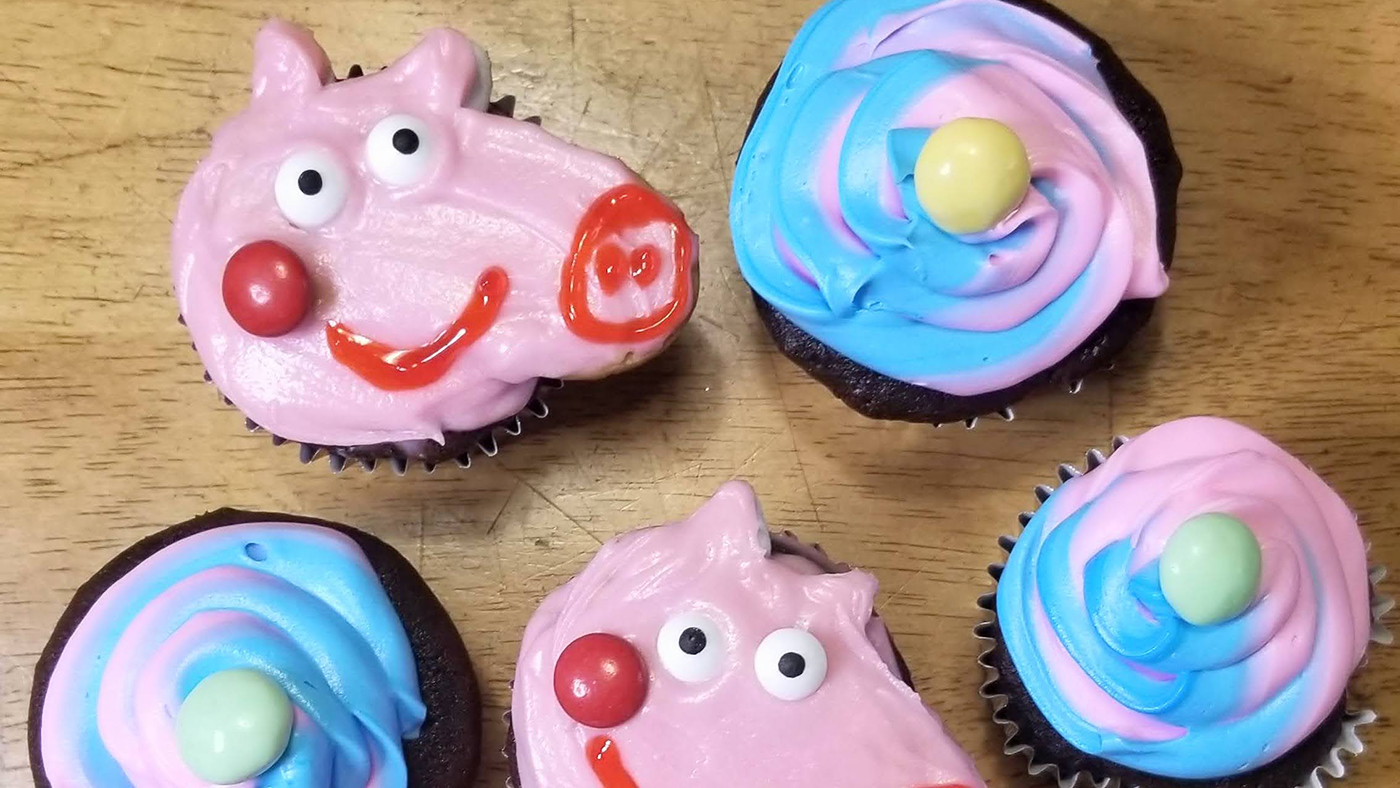
    peppa pig-inspired cupcakes anyone can make; showing two peppa cakes next to five pink and blue ones
    Photos: Candace Braun Davison

    And honestly, these Peppa cakes are incredibly simple to whip up. In fact, you could put out the ingredients, make a display cupcake, then have a group of kids decorate them themselves. (Hey, it’s a party dessert and craft! Win-win!) Nutter Butters are key to creating her snout, though you could probably use Vienna Fingers or Keebler Elf Cookies.

    Check out this video for the full demo, and be sure to tag me if you make them, so I can see your creations!

    What You’ll Need:

    • One batch cupcakes, any flavor (I made 24)
    • Roughly 2 cups (16 ounces) vanilla buttercream frosting
    • 5-6 drops pink food coloring
    • 12 Nutter Butters
    • 12 marshmallows
    • 48 candy eyes
    • 24 red M&M’s
    • Red gel frosting

    How to Make Peppa Pig-Inspired Cupcakes:

    1. Mix the pink food coloring with the vanilla buttercream, adding just 2-3 drops at a time until you reach the peachy-pink shade of Peppa’s skin. Dollop a little on the cupcake.
    2. Twist a Nutter Butter apart so it’s in two halves. Place one half on the cupcake, with about a third of the Nutter Butter hanging off the edge, forming her snout. Save the other Nutter Butter half for the next cupcake.
    3. Cut a marshmallow diagonally, forming two triangles. These will be Peppa’s ears. Stick them close together, but not touching, atop Peppa’s “head.”
    4. Coat the Nutter Butter and marshmallow halves in more pink frosting. Add two candy eyes and a red M&M for her rosy cheek, then draw a snout and smile using red gel frosting.
    peppa pig-inspired cupcakes shown next to Peppa figurines

    Note: We are not affiliated with Peppa Pig, Paramount Networks or Nick Jr. We’re just fans of the show, paying homage to the series. This tutorial originally ran in April 2020. It has since been updated to ensure accuracy and adhere to SEO best practices.

  • How to Make a ‘Bluey’-Inspired Cake (An Easy, No-Fondant DIY)

    How to Make a ‘Bluey’-Inspired Cake (An Easy, No-Fondant DIY)

    Jump to Recipe

    When it comes to hosting a Bluey-inspired birthday party, you could pop a few figurines onto a store-bought sheet cake and call it a day. That works. But I like the challenge of baking pop culture-inspired treats (see: Baby Yoda, Sesame Street, Winnie the Pooh and the like), so I couldn’t resist trying my hand at recreating the star of what’s arguably the most delightful kids’ show on TV for my daughter’s third birthday. It was time to bake a Bluey cake!

    And after a few people asked me to share how I did it, I’m posting it here for you. I hope it helps, if you’re considering baking one too.

    First, a Few Things You Should Know Before Baking:

    While some Etsy sellers make Bluey-inspired cake pans, you don’t need one for this recipe. A simple, 9″x13″ pan will do. There’s no fondant in this either; just a simple, crowd-pleasing buttercream. (Go ahead and use store-bought; I don’t judge!)

    The cake can be any flavor, straight from a box mix or from scratch. (Confession: I went boxed, using King Arthur Confetti Cake Mix.) You’ll just want to pour the batter into a 9″x13″ pan, cooking according to the recipe’s instructions (it should be springy to the touch, and a toothpick inserted into the center should come out clean, or with a couple crumbs; no goo). Let it cool completely.

    Follow the instructions below for a basic walkthrough of what to do. If you’d like more exact instructions, down to how much food coloring I used, jump all the way to the bottom of this story for the recipe card. It’s more detailed.

    How to Make a ‘Bluey’-Inspired Cake:

    A 9"x13" confetti cake was cut into four pieces to form Bluey's head, snout and ears in this Bluey-inspired cake
    It’ll take some trial and error to get the sizes just right. Start a little big, then trim it down. (Photos: Candace Braun Davison)

    1. Cut the Cooled 9″x13″ Cake in Half

    You’re creating two 9″ by 6.5″ rectangles. One will be the base of Bluey’s head; the other will be chopped up to form the snout and ears.

    2. Trim & Fit the Snout

    The snout should be about 3″ wide (so it takes up about a third of Bluey’s face)—you’ll want to create two 3″ strips, so the snout sits a bit taller than Bluey’s head, creating a more 3-D effect. Place one piece to the right of the 9″x6.5″ rectangle, then add the other on top. You may need to trim these pieces a bit to look proportionate. (I shaved the top piece on one side, so the snout starts out flush with Bluey’s head and gradually protrudes, so it didn’t look so abrupt and blocky.)

    The Bluey cake has been covered in a base layer of light blue frosting

    3. Make Your Frosting

    Store-bought or homemade frosting works here! I used vanilla buttercream. You’ll want to have six colors on hand: white, tan, light blue, medium gray-blue, dark blue and black. I divided a batch of frosting into four bowls: a little for white, a few spoonfuls for the black frosting, about 1/3 cup for the tan, and the rest went into a bowl for creating the shades of blue.

    For the blue frosting, I added a tiny bit of food coloring at a time, until I got the right sky blue. Since that’s used first, I covered the cake with it. I set aside about 1/4 cup for the medium blue (which was tinted with a tiny drop of black, to give it a more subdued, gray-blue tone), then used the rest to create the vibrant, dark blue.

    4. Frost the Cake, Color by Color

    I used a piping bag with a large circular tip to outline the dark blue frosting (a resealable bag with an end snipped works too!) and smoothed it out with a butter knife.

    I used a similar method with the white frosting to create Bluey’s big, eager eyes, then filled in his tan snout and ears.

    After that, I added the medium blue stomach and eyebrows. (You could go truer to character, adding white instead of black and making this the palest blue, but I liked that the eyebrows/belly didn’t distract from Bluey’s face.)

    The completed Bluey cake, including a frosting face

    5. Add that Signature Smirk

    Using a smaller round piping tip, I added Bluey’s smiley and pupils.

    Annnnd that’s it! You’re ready to pop on the candles and surprise the birthday boy or girl (or full-grown adult with a healthy appreciation for the kookier things in life).

    Bluey birthday party - cake reveal

    Show me your Bluey cake!

    One of the things that keeps me updating this site—and honestly, truly makes my week—is when people DM me the treats they’ve made. I’ve received half a dozen photos of people’s Bluey-inspired cakes, and it’s such a gift. If you made it, please send it my way! You can DM it to me via Instagram (@lifebetweenweekends).

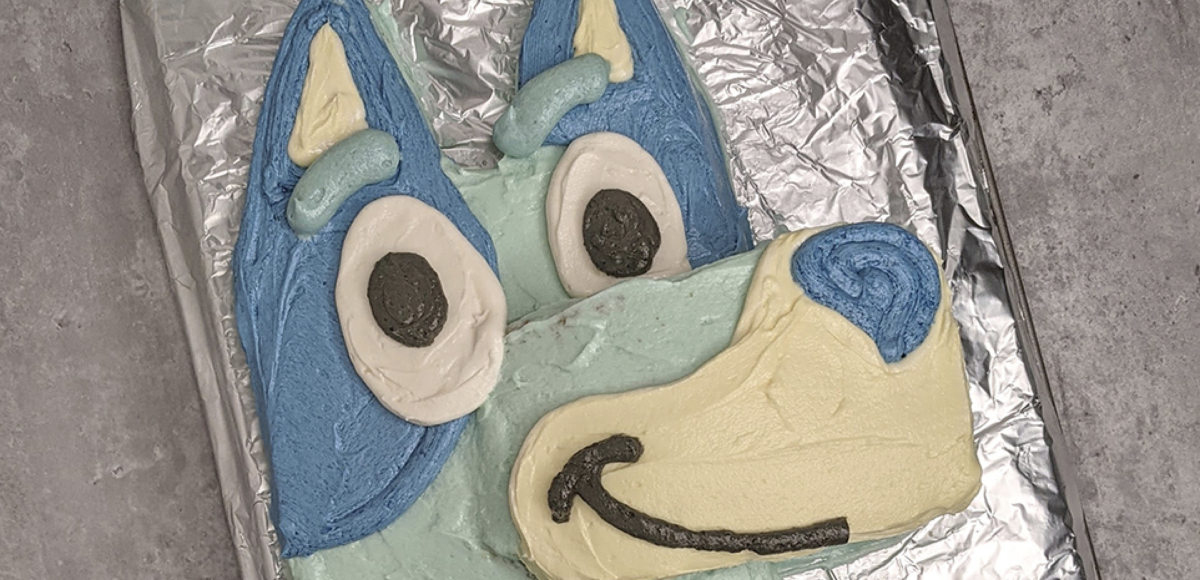
    how to make a bluey cake

    Bluey-Inspired Cake

    Using a 9"x13" pan and plenty of buttercream frosting, you can make your own Bluey-inspired cake that looks just like the cartoon blue heeler.
    Prep Time 2 hours
    Cook Time 30 minutes
    Total Time 2 hours 30 minutes
    Course Dessert
    Cuisine American
    Servings 8

    Equipment

    • 1 serrated knife (for cutting/carving cake)
    • 3 small bowls
    • 1 mixing bowl
    • 4 spoons
    • 1 butter knife or small offset spatula
    • 5 piping bags or resealable plastic bags with a corner snipped

    Ingredients
      

    • 1 cake, baked in a 9"x13" pan and cooled
    • 4 cups vanilla buttercream frosting (any recipe or store-bought)
    • 1 yellow gel food coloring
    • 1 red gel food coloring
    • 1 blue food coloring
    • 1 black food coloring

    Instructions
     

    • Prep the Frosting: You'll need to create six colors: white, black, tan, light blue, medium gray-blue and dark blue. Reserve 3 cups for the blue details; the other cup can be divided first in half—with half going to the tan color, and the remaining half split to become the white and black shades.
    • Place the white frosting into a piping bag or resealable bag and set aside.
    • Create the Black Frosting: In a small bowl, add vanilla frosting and a couple drops of black food coloring at a time, stirring until you reach the shade you want. Place in a piping bag or resealable bag and set aside. If you have a small round piping tip—with a hole about the size of a Magic Marker—use that for the black icing, or try cutting a hole about that size into your plastic baggie when the time comes.
    • Create the Tan Frosting: In another small bowl, combine the vanilla frosting with half a drop of yellow and the tiniest smidge of red—I dipped a toothpick into red to get the tiniest amount at first—stirring to create a tannish orange color. (You may need to add vanilla if it turns out too orange-y at first.) Gradually add color until you get the hue you want, then bag it up. (NOTE: You can skip the mixing and get a very reliable tan if you use tan or copper gel food coloring instead; it can just be harder to find.)
    • Create the Pale Blue Frosting: Place the 3 cups of frosting for the blue tones in a large mixing bowl. Add 2-3 drops of blue, stirring until you have a light sky blue. After you've used this to frost the head, we'll return to this bowl and the remaining frosting within it to create the darker shades!
    • Shape Bluey's Head: Take the 9"x13" cake and cut it widthwise, creating two 9"x6.5" rectangles. Set one on a cake stand or large plate to be the base of Bluey's head. We'll use the other to create the snout and ears.
    • Create Bluey's Snout and Ears: Cut two 3" strips to form the snout, and use the remaining piece to cut out two triangles for the ears. You'll place one snout piece next to the rectangular cake, frosting the whole thing in pale blue, then place the second snout piece on top and frost that. This gives the snout a more 3D effect. (Before placing the top piece, I also carved the left side, so it looked more like a wedge. That way it'd be more flush with Bluey's head, gradually sloping upward once frosted.)
    • Frost Bluey's whole head pale blue. With the remaining frosting, set aside about 1/4 cup for the medium blue, placing it in another small bowl. Add a tiny drop of black gel food coloring—or squirt a tiny bit of black frosting—and stir together to create a slightly darker, almost grayish-teal shade. Place in a piping or resealable bag.
    • Use the rest to create the dark blue shade right in the mixing bowl, adding a couple drops of blue food coloring, stirring in between, until you reach your desired shade. Place in a piping or resealable bag.
    • Decorate Bluey's Face: I started with her dark blue ears, patches around her eyes and nose, piping the color on and then smoothing it with a butter knife. (An offset spatula works too!) Then, I added large white eyes, then filled in the tan inner ears and snout, before drawing Bluey's medium-blue stomach and eyebrows.
    • Add Bluey's smile and pupils with black frosting. That's it! You did it!
    Keyword cake

    Want Even More Bluey Birthday Cake Ideas?

    Other bakers (and stores) have put their own riffs on the look as well. Here are some of our favorites:

    • If you’re not a baker: Try adding a custom Bluey-inspired cake topper
    • If you’re a newbie baker: Frost a classic round cake with blue icing and crushed graham cracker sand, then add cocktail umbrellas and Bluey figurines for a Bluey at the beach theme, like this cute cake
    • If you’re an advanced baker: Enjoy dabbling with fondant? Bluey’s official website offers a tutorial for making a fondant-covered, two-tier cake that resembles Bingo and Bluey’s faces

    This article originally ran in June 2022. It’s been updated to include more inspo & ideas for fellow Bluey fans. (Also, a quick disclaimer: I have no affiliation with Bluey, its creators or the BBC/Disney+. This is purely an homage.)

  • Barbie-Inspired Movie Snack Mix

    Barbie-Inspired Movie Snack Mix

    Jump to Recipe

    Quick disclaimer: This post contains affiliate links, which means we receive a small commission from items sold through them. This helps fund the operation of the site.

    Hype surrounding the Barbie movie has reached a fever pitch, and its July 21 premiere can’t come soon enough (both for those psyched to see the movie and those tired of hearing nonstop buzz about it). Pinterest even reported that searches for all kinds of Barbie food were on the rise, particularly Barbie cakes and pink treats, be they cocktails or cookies.

    But in my book, the ideal Barbie-themed snack is one I can bring to the theater, munching as I watch. I’ve always loved sweet and salty combos, so I created a little pink chocolate trail mix—which I’m dubbing a Barbie-Inspired Movie Snack Mix—that can be stirred into a bucket of popcorn at the theater to savor during the screening. Of course, that’s provided your theater allows you to bring in snacks—and if they have a policy against it, please listen to them and save the treat for your ride home.

    Photos: Candace Braun Davison

    This Barbie-inspired snack mix blends well with warm, buttery popcorn: The pretzels play up the saltiness, which is balanced out by the sweetness of the Honey Nut Chex and pink chocolate. Dark chocolate M&M’s add depth and richness; they’re a must over regular M&M’s in my book (otherwise it could be cloyingly sweet).

    What Substitutions Can I Make With This Snack Mix?

    • You can use candy melts instead of white chocolate chips (and save a step by using pink candy melts, rather than coloring them yourself, if you’d like)
    • We scored the dehydrated marshmallows at Michaels, and Amazon sells them, but you could just as easily use Lucky Charms
    • Feel free to swap out the Honey Nut Chex for another variety or another type of cereal entirely

    How Do I Store The Snack Mix?

    You can store the mix—separate from any popcorn—in an airtight container for up to three days; five if you nix the Lucky Charms/dehydrated marshmallows, because they can get soggy fast. (Popcorn also tends to suck up moisture, becoming soft and, well, generally unpleasant to eat.)

    rainbow bag of barbie-inspired chocolate pretzel snack mix

    Barbie-Inspired Movie Snack Mix

    Mix into warm popcorn, and you've got a salty-sweet snack that can't be beat.
    Prep Time 10 minutes
    Resting Time 20 minutes
    Total Time 30 minutes
    Course Snack
    Cuisine American
    Servings 8 servings

    Equipment

    • measuring cups
    • 1 microwave-safe bowl
    • 1 sheet parchment paper
    • 1 Baking sheet

    Ingredients
      

    • 2 cups pretzels
    • 1 cup Honey Nut Chex cereal
    • 1/2 cup dehydrated marshmallows (or Lucky Charms)
    • 1/4 cup dark chocolate M&Ms
    • 1 cup white chocolate chips (or white candy melts)
    • 8-10 drops pink gel food coloring
    • 1 tablespoon sprinkles

    Instructions
     

    • Lightly crush pretzels, then spread them out on a parchment-lined baking sheet along with the Honey Nut Chex, marshmallows/Lucky Charms and M&Ms. (Some overlap is great.)
    • In a microwave-safe bowl, pour white chocolate chips and heat in 30-second intervals, stirring in between, until fully melted (about 2 minutes). Stir in pink food coloring, a few drops at a time, until you achieve the shade of pink you want. Use a spoon—or place in a resealable plastic bag with the corner snipped—to drizzle the pink chocolate over the snack mix. Top with sprinkle and set aside until fully cooled, at least 20 minutes.
    • Crumble the mix into bite-sized pieces and place in bags. Sprinkle and mix into popcorn before serving, or enjoy as is.
    Keyword popcorn, trail mix

    Oh, and in case you’re curious, I used Supernatural Rainbow Pop Sprinkles, Fancy Sprinkles Jelly Hues in Malibu Pink for the gel food coloring and Dollar Tree rainbow treat bags (no longer sold, but Amazon has a similar set here).

  • Buddy the Elf-Inspired Breakfast Pancakes

    Buddy the Elf-Inspired Breakfast Pancakes

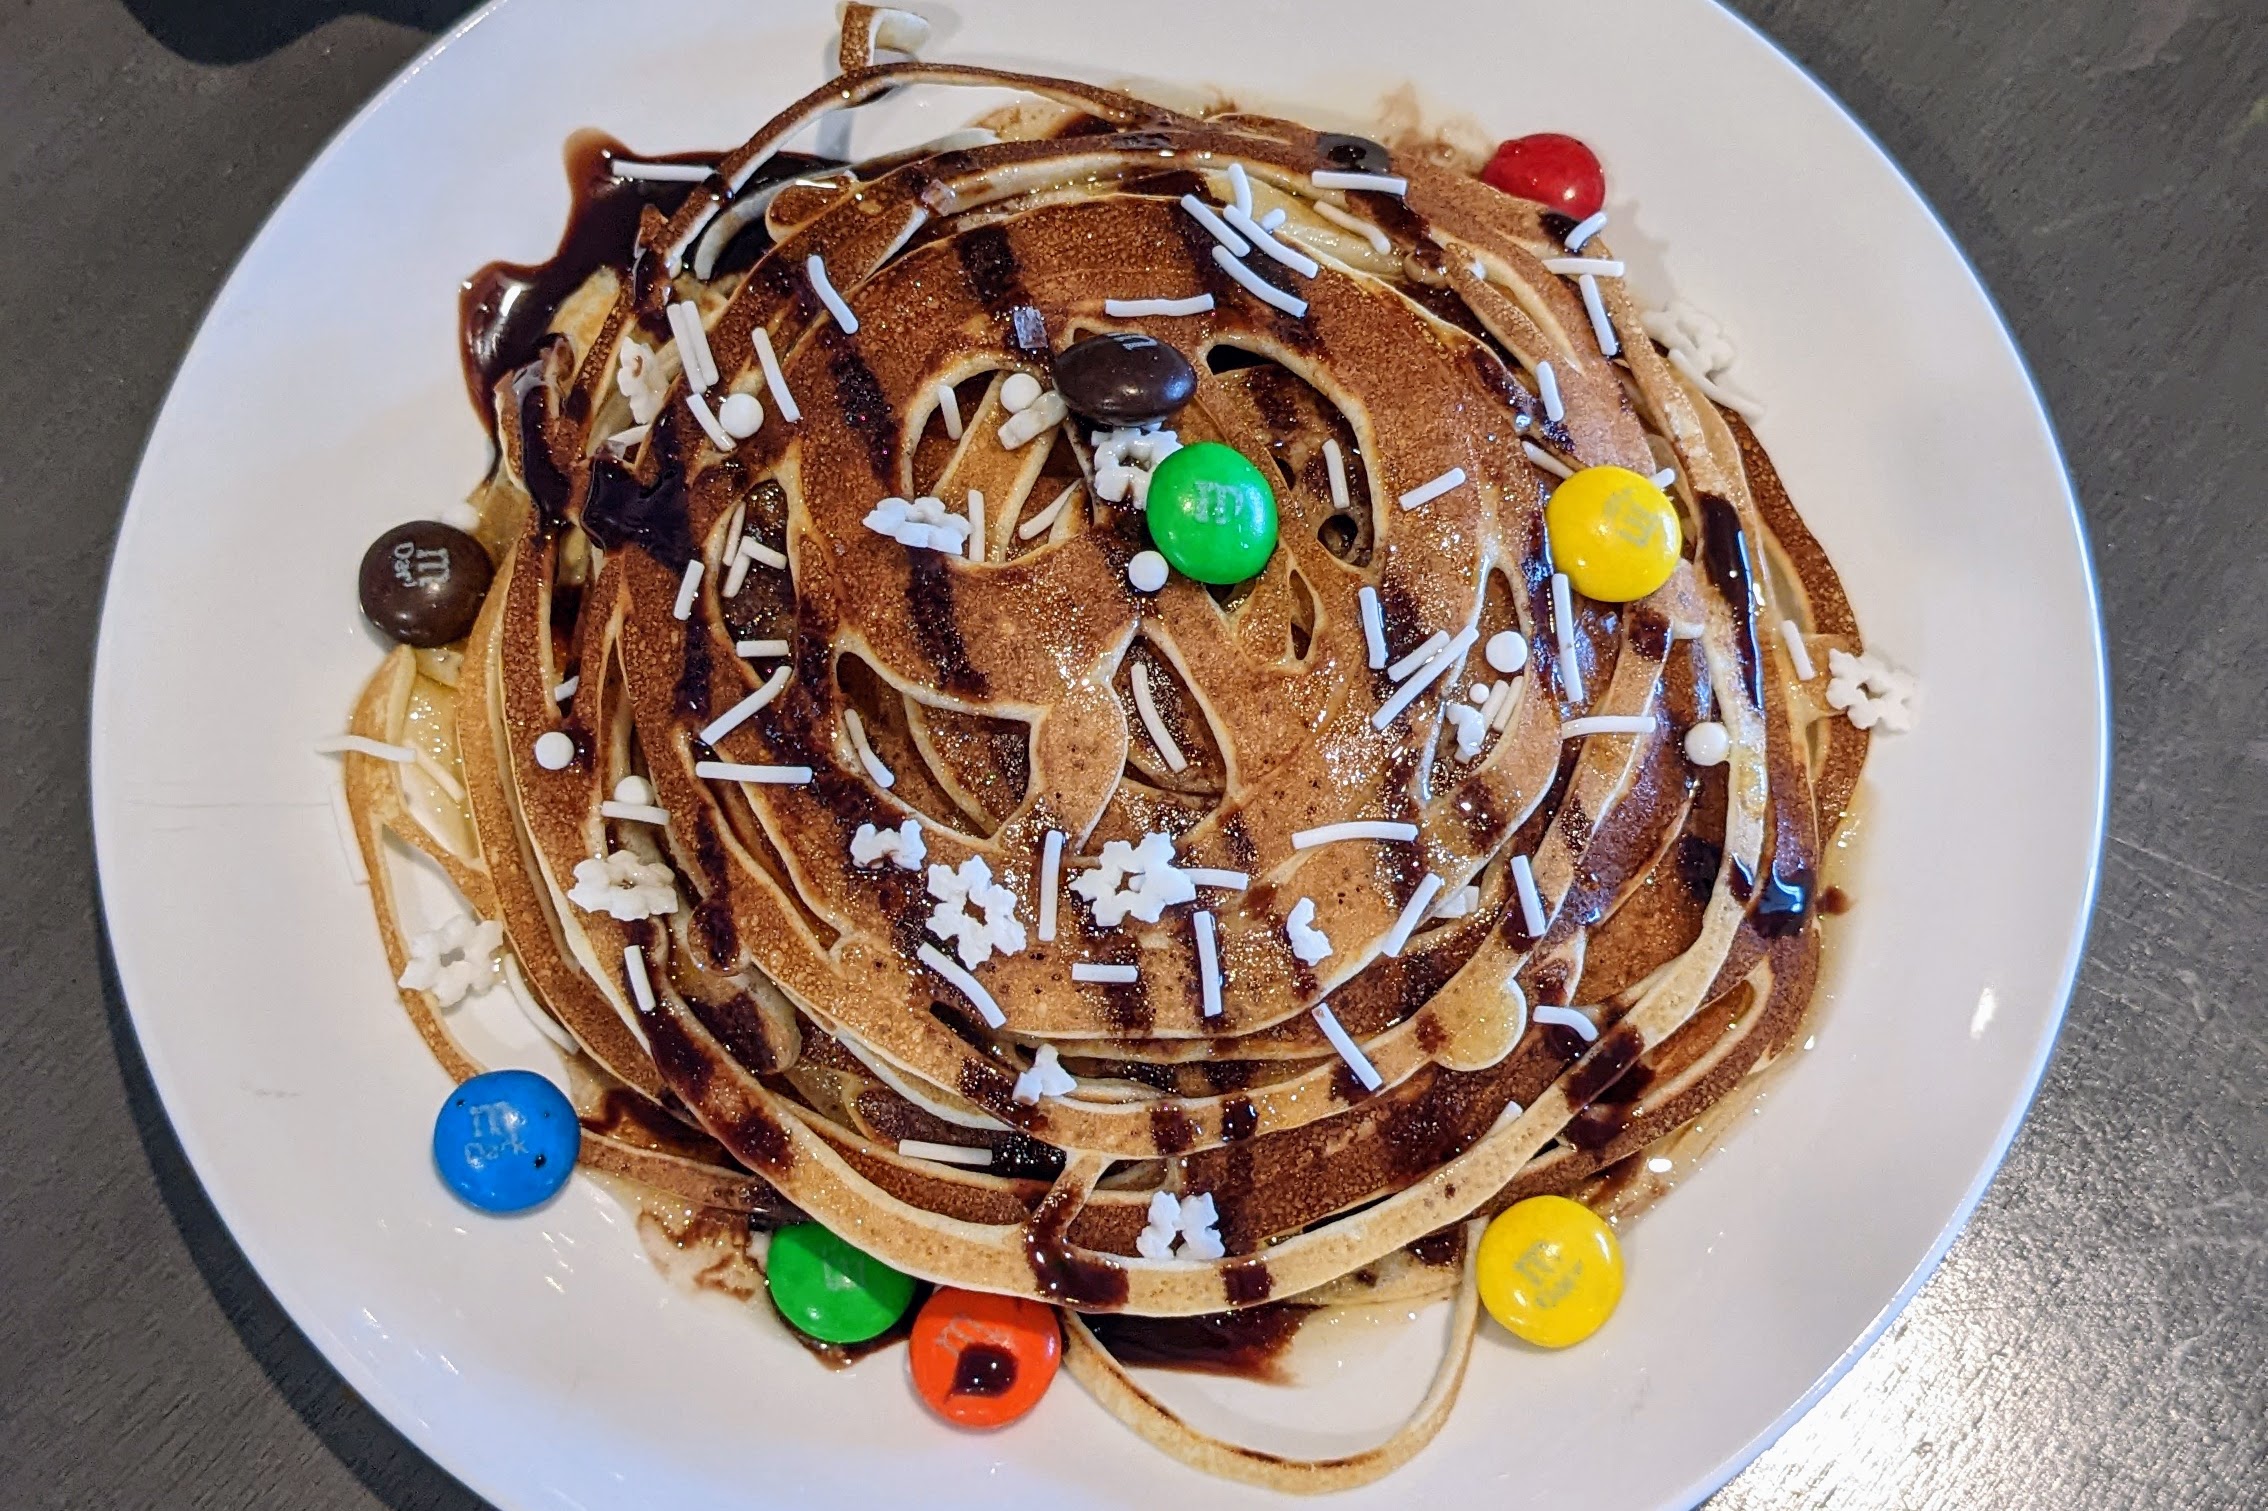
    Normally, I’m all for pasta in its various forms…but I can’t get behind Buddy’s breakfast spaghetti in Elf. However, the recent pancake spaghetti and pancake cereal trends got me thinking: What if you used flapjack batter as the base instead?

    stack of buddy the elf, squiggly pancakes with m&ms and chocolate syrup next to christmas tree mug
    Photos: Candace Braun Davison

    Using a resealable plastic bag with the corner snipped, I created squiggly pancakes that—when stacked up—look remarkably like spaghetti. Create a toppings bar for people to decorate their short stacks however they wish, and you’ve got a Buddy the Elf-worthy breakfast that’s perfect for a holiday party, Christmas morning or even a lazy Saturday that could use a little magic.

    (Pro tip: Amp up the supernatural vibes with a drizzle of Runamok Sparkle Syrup, which is regular maple syrup swirled with pearlescent mica.)

    Buddy Breakfast Pancakes Toppings Ideas:

    • Chocolate sauce
    • Sparkle syrup
    • Sprinkles
    • Mini marshmallows
    • Raspberries
    • Blueberries
    • Strawberries
    • Chopped bananas
    • Crumbled Oreos
    • Mini chocolate chips
    • M&M’s
    • Peanut butter (warm for 30 seconds to easily drizzle it)
    • Marshmallow creme
    • Crushed pretzels
    stack of buddy the elf-inspired pancakes beside a christmas tree mug, in front of a christmas tree

    Buddy the Elf-Inspired Breakfast Pancakes

    We aren't affiliated with 'Elf' or New Line Cinema; we're just fans producing pancakes for other fans to celebrate the film and the season.
    Prep Time 5 minutes
    Cook Time 15 minutes
    Total Time 20 minutes

    Equipment

    • 1 mixing bowl
    • 1 silicone spatula
    • 1 resealable plastic bag, sandwich or gallon size
    • 1 saute pan (at least 8 inches wide)
    • 1 spatula

    Ingredients
      

    • 1 batch pancake batter (from recipe or box mix)
    • 1/2 cup chocolate syrup
    • 1/2 cup sprinkles
    • 1/2 cup M&M's
    • 1/2 cup maple syrup

    Instructions
     

    • Prepare pancake batter according to the recipe or box instructions. (It should be a little thicker than buttermilk; runny enough that it's easy to squeeze out of the resealable bag.) Pour it in batches into a resealable plastic bag, adding only about a cup at a time so it's easy to draw with.
    • Add butter or cooking spray to the bottom of the sauté pan. Heat over medium-low heat. Once warmed, snip the corner of the resealable bag and use it to draw a squiggly spiral onto the pan.
    • Once a lip forms around the edge of the pancake and bubbles appear in the batter (around 1 minute), carefully flip and continue cooking until lightly golden on both sides.
    • Top however you wish. We used a handful of sprinkles and M&M's on each, as well as a drizzle of chocolate syrup and maple syrup to top things off. Serve immediately.

    We aren’t affiliated with Elf or New Line Cinema; we’re just fans producing pancakes for other fans to celebrate the film and the season.

    This post contains affiliate links, and purchases made through those links help fund Life Between Weekends.

  • Oreo Truffle Monsters

    Oreo Truffle Monsters

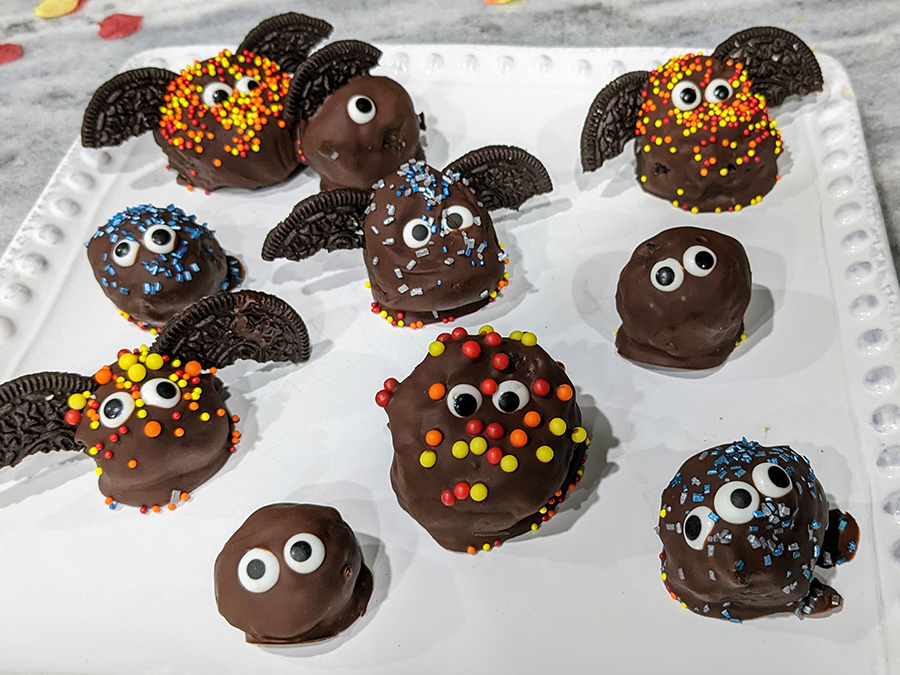
    When it comes to kid-friendly Halloween treats, it doesn’t get better than this. Oreo truffle monsters hit all the right notes: Kids get to smash Oreos, roll balls of Play-Doh-like batter, dip things in molten chocolate and decorate away. And, by virtue of these no-bake treats being “monsters,” they don’t demand perfection. The goofier, the better.

    Who cares if your chocolate’s too gloppy? Or your dough balls are more like lumps? It adds to the charm of these little creatures, which taste awesome—and outrageously decadent—no matter what.

    Photos: Candace Braun Davison

    Put out little bowls of all kinds of sprinkles and candy, and let guests go wild decorating these treats as they see fit. After a little stint in the fridge to solidify, they’re ready to enjoy.

    Oreo truffle monsters recipe

    Oreo Truffle Monsters

    These no-bake treats pack a lot of personality.
    Prep Time 30 minutes
    Total Time 30 minutes
    Course Dessert
    Cuisine American
    Servings 18 truffles

    Equipment

    • 1 gallon-size resealable plastic bag
    • 1 large mixing bowl
    • 1 silicone spatula
    • 1 microwave-safe bowl
    • 1 spoon
    • 1 parchment-lined baking sheet

    Ingredients
      

    • 1 family-size (19.1-oz.) package Oreos
    • 1 (8-ounce) package cream cheese
    • 1 (10-ounce) package semisweet chocolate chips
    • 1 tbsp canola oil or melted coconut oil
    • 36ish candy eyes (1 container)
    • 1 jar sprinkles

    Instructions
     

    • Place two of the three sleeves of Oreos in a gallon-size bag. (Set the rest aside to decorate your monsters—you can break them in half to form "wings" or crumble bits to use as hair, for example.) Seal the plastic bag and use a rolling pin or back of a spoon to finely crush cookies. They should be smaller than gravel.
    • Mix in softened cream cheese until a dough forms. Roll into one-inch balls. Set on baking sheet and place in fridge to harden.
    • In a microwave-safe bowl, combine chocolate chips and oil. Heat in 30-second intervals, stirring in between, until it's drizzle-able. (It should be about as thick as pancake batter.)
    • Dunk each Oreo ball in chocolate, submerging it completely. Place dipped balls on the parchment-lined baking sheet. Decorate each one right away with candy eyes, sprinkles and Oreo "wings" as you see fit.
    Keyword chocolate chips, dessert, no-bake, truffles
  • The ‘Hocus Pocus’-Inspired Book Cake Even Toast-Burners Can Make

    The ‘Hocus Pocus’-Inspired Book Cake Even Toast-Burners Can Make

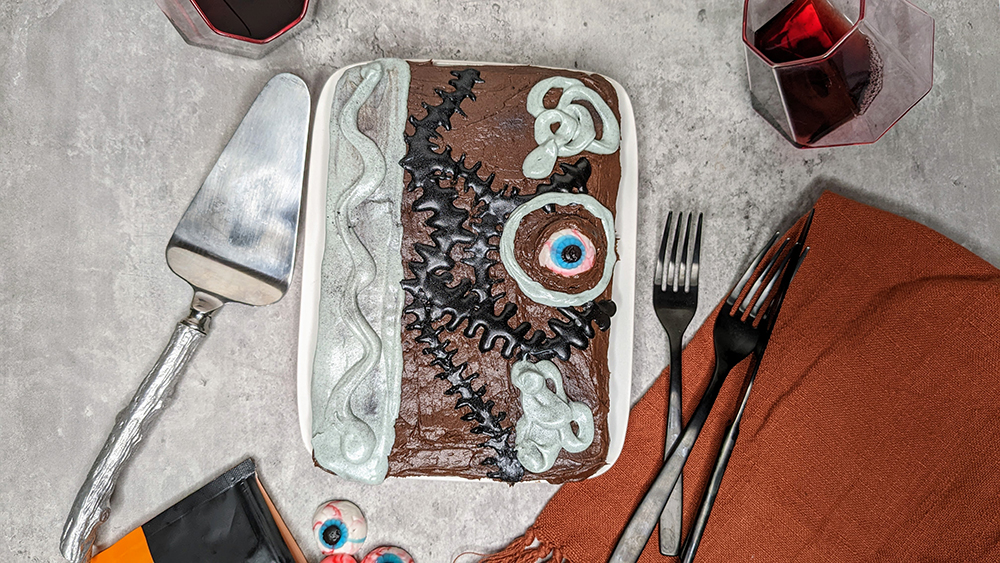
    Years ago, I made Hocus Pocus-inspired s’mores pops, and they were an unexpected hit. (To this day, I see people recreate them, and it makes me unspeakably happy.) But then I had a child, and my baking days are often late at night, or squeezed within whatever spare 15 minutes I have, when I’m half-exhausted and totally distracted. So I need something simpler.

    And in honor of Hocus Pocus 2, I decided to go big or go home. And by that, I mean, riff on my earlier concept, only supersize it—so you’re not making a dozen or more teeny tiny books—and make it something even little hands could help prepare. Faster than you can say, “amuck, amuck, amuck,” the Spellbook Cake was conjured.

    Here’s What You’ll Need:

    How to Make a Hocus Pocus-Inspired Book Cake:

    1. Bake a cake in a 9″x13″ pan—or 8″x8″ square, according to the recipe’s instructions. (I’m all for using a box mix here; they’re easy to carve and still taste moist. Again, shortcuts.) If you bake it in the square pan, let it cool fully and trim it to be more rectangular. Eat the cake scraps as you decorate (bonus!).
    2. Once the cake has completely cooled, cover it in chocolate buttercream. Add the gummy (or candy) eyeball on the righthand side of the cake, about halfway down it. Nestle it in or use a little chocolate frosting to give it eyelids.
    3. Make the Gray Chocolate Details: Microwave white chocolate in 30-second intervals, stirring in between, until it’s glossy and drizzle-able. You may need to stir in a teaspoon of butter if it’s a bit thick. (Don’t use water; that will make the chocolate seize and turn gritty.) Stir in a few drops of the black cookie frosting at a time, until you reach a pale gray color.
    4. Spoon gray chocolate into a plastic bag and snip off one corner. Use it to draw the swirled snake-like shapes on the righthand corners of the “book,” as well as a rectangle along the lefthand side. Smooth out the rectangle, then draw a wavy snake on top of it.
    5. Use the black cookie frosting to draw “stitches” along the face of the book. For finer, more detailed lines, draw lines with the frosting, then use a toothpick dipped into those lines to make the stitches. (If you draw the stitches with the frosting tube, they tend to be a bit thicker and gloppier, as you can see with some of the lines on my cake.)
    6. Top with a light sprinkling of shimmer dust, if desired.

    Disclaimer: We are not affiliated with Disney or the Hocus Pocus franchise; we’re just fans of the movie (and, hopefully, its sequel).

    This post contains affiliate links, which help fund the operation of the site.

  • ‘Star Wars’-Inspired Wookiee Pies, AKA Chocolate Chip Oatmeal Creme Pies

    ‘Star Wars’-Inspired Wookiee Pies, AKA Chocolate Chip Oatmeal Creme Pies

    First, a disclaimer: I have no affiliation with Disney, Lucasfilm or the artist formally known as Chewbacca. It’s just a tribute for Star Wars fans to enjoy.

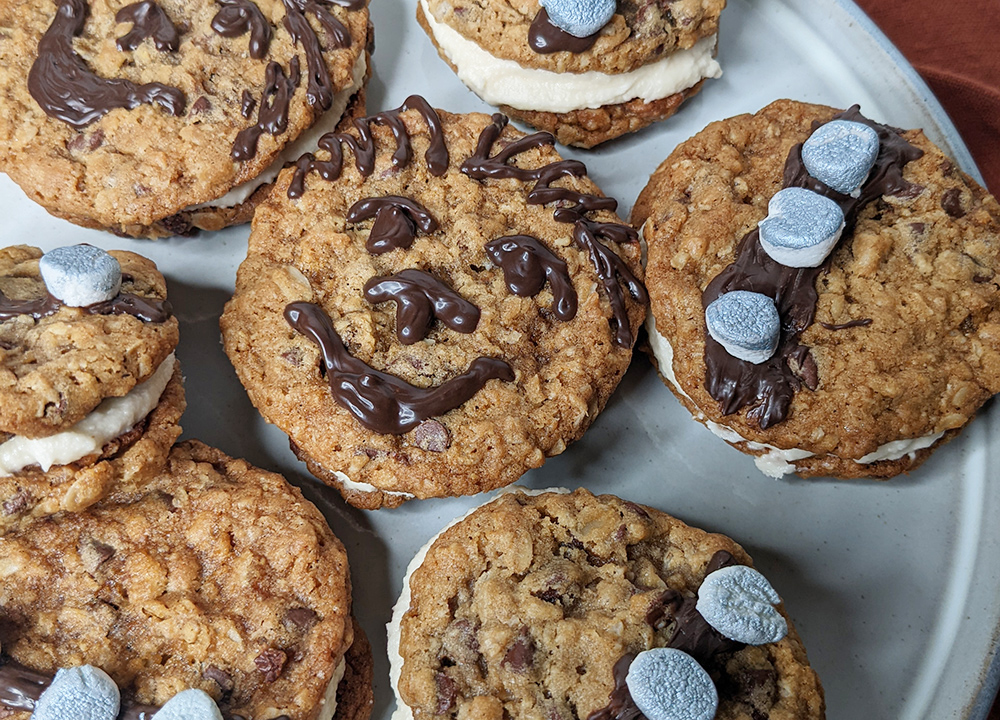
    Time for a double dose of nostalgia: Little Debbie Oatmeal Creme Pies meets an homage to the unsung, hairy, anxiety-riddled hero of the Star Wars franchise (no, not Kylo Ren). I created a simplified version of Sally’s Baking Addiction’s Homemade Oatmeal Creme Pies, then studded them with mini chocolate chips and striped the outside with melted chocolate and silver-food-coloring-coated mini marshmallows.

    These Wookiee Pies are an admittedly labor-intensive way to celebrate May the Fourth—more so than our Baby Yoda cupcakes, I dare say—but oh so worth it. It’s the kind of project you could split up into two nights, if you wanted, baking the cookies the first night (and okay, nibbling on a few), then decorating them the second. And they add just the right amount of magic to an otherwise ordinary weeknight.

    But, if it all feels like too much effort, I won’t blame you if you buy a pack of Little Debs, swipe a line of store-bought chocolate frosting on ’em for Chewie’s bandolier and call it a day.

    Psst: You can use edible paint, Wilton’s Color Mist or edible shimmer powder to turn the mini marshmallows silver.

    Wookiee Pies recipe

    Wookiee Pies (Chocolate Chip Oatmeal Creme Pies)

    Mini chocolate chips stud these chewy oatmeal sandwich cookies.
    Prep Time 45 minutes
    Cook Time 9 minutes
    Total Time 54 minutes
    Course Dessert
    Cuisine American
    Servings 12 sandwich cookies

    Ingredients
      

    Chocolate Chip Oatmeal Cookies

    • 2 1/2 sticks unsalted butter, softened
    • 1 1/2 cups dark brown sugar
    • 1 large egg, room temperature
    • 1 1/2 cups all-purpose flour
    • 1 teaspoon baking soda
    • 1/2 teaspoon salt
    • 1 teaspoon ground cinnamon
    • 1/4 teaspoon ground cloves
    • 3 cups old-fashioned oats
    • 1 cup mini semisweet chocolate chips

    Vanilla Creme Filling

    • 1 1/2 sticks unsalted butter, softened
    • 3 cups confectioners' sugar
    • 3 tablespoons heavy cream
    • 1/2 tablespoon vanilla extract
    • 1/8 teaspoon salt

    Chewbacca Decorations

    • 30 mini marshmallows
    • silver Color Mist or edible paint (for marshmallows; optional)
    • 1/2 cup mini semisweet chocolate chips

    Instructions
     

    • Preheat oven to 375 degrees F.
    • Make the cookies: In a large bowl, combine butter and brown sugar. Use an electric mixer to cream the two until they're light and fluffy, about a minute. Scrape down the sides and beat in the egg and vanilla.
    • Add flour, baking soda, salt, cinnamon, cloves and oats, mixing on low until combined. Fold in chocolate chips. Scoop the dough into one-inch balls and place about two inches apart on a parchment-lined baking sheet. Bake for 8 to 9 minutes, or until lightly golden. Let cool.
    • Make the creme filling: In another large bowl, combine butter and confectioners' sugar. Use a clean electric mixer to cream the butter and sugar, about one minute. Add heavy cream, vanilla and salt, mixing until light, fluffy and spreadable, about one minute more.
    • Decorate half the cookies: Match up similarly sized cookies. Designate one as the "face" of the cookie. Set aside.
    • Cut mini marshmallows in half and coat in silver Color Mist or edible paint. Set aside.
    • Place chocolate in a microwave-safe bowl and microwave in 20-second intervals, stirring in between, until fully melted and smooth. Add to a resealable plastic bag, snip off a corner, and use to pipe on Chewie faces or the bandolier belt. Top each chocolate belt with a row of marshmallows.
    • Assemble the cookies: Spread creme filling on half and top with the matching cookies. Serve.
    Keyword cookies, dessert, oatmeal creme pie
  • Jack Skellington-Inspired Hot Cocoa Bombs

    Jack Skellington-Inspired Hot Cocoa Bombs

    If you want to dress up as Jack, Sally, or even Zero from The Nightmare Before Christmas this Halloween, there’s no shortage of off-the-rack costumes you can buy from, well, just about anywhere (from Amazon to Hot Topic to Walmart). But if you’re really looking to go all out this year—or simply host an epic watch party one night—you’ve got to whip up these Jack Skellington-inspired Hot Cocoa Bombs.

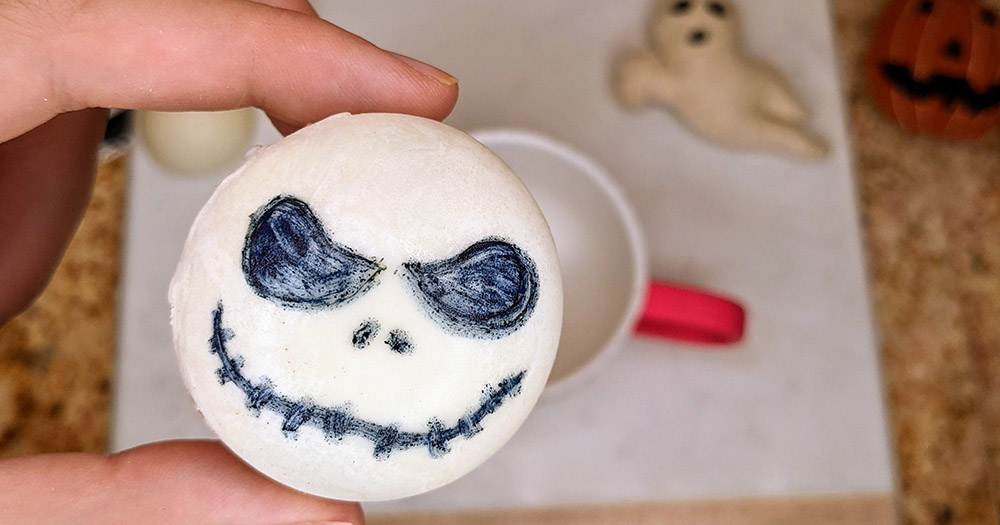
    Jack Skellington-inspired hot cocoa bombs for Halloween 2021
    Photos: Candace Braun Davison

    They’re surprisingly easy to make, as long as you have a silicone mold and a black food coloring pen. And what you fill in them is totally your call, beyond the standard hot cocoa mix: mini marshmallows, candy, sprinkles, sugar eyes. I opted for a blend of black, red and green sprinkles, Sno Caps and candy eyes, to give it that blurring-of-the-seasons vibe. You can pour warm milk over each white chocolate orb to melt ’em, or create more of a mocha latte by pouring hot coffee or espresso on top. (If you don’t like really sweet drinks, opt for the latter.)

    For a little added fun, scroll to the bottom to watch these Halloween-y hot cocoa bombs melt—while testing your knowledge of Nightmare Before Christmas trivia.

    Making Jack Skellington-inspired hot cocoa bombs in a silicone mold

    One quick note: We aren’t affiliated with Disney, Tim Burton or Touchstone Pictures in any way. This is just a DIY by fans, for fans.

    How to Make Jack Skellington-Inspired Hot Cocoa Bombs:

    Yields 6 hot cocoa bombs

    What You’ll Need:

    Ingredients:

    • 1 1/4 cup (10 oz.) white chocolate baking chips or white candy melts
    • 6 heaping tablespoons hot cocoa mix (about 3 to 4 single-serve packets)
    • Mix-ins: Sno Caps, sprinkles, marshmallows—whatever you prefer
    • 4 cups milk or coffee

    Directions:

    1. In a small, microwave-safe bowl, pour in half of the white chocolate pieces. Microwave in 30-second intervals, stirring in between, until fully melted. Grab the silicone mold and use a spoon to coat a thin layer of white chocolate inside each hemisphere. Pop it in the fridge to harden, about 10 minutes. (As it cools, set up your hot cocoa mix and mix-ins, so they’re ready to go.)
    2. Remove white chocolate hemispheres from the mold. Fill half with roughly a tablespoon of hot cocoa mix and whatever treats you’d like.
    3. Fuse the spheres together: Place the plate in the microwave, heating for 10-15 seconds until warm. Grab an empty white chocolate hemisphere and gently place it edge-side down on the plate, twisting a little to melt the edge. Place it on top of a filled hot cocoa bomb half, running your finger along the edge to smooth the melted chocolate along the seam and seal it. Complete with remaining halves. (Note: You may want to pop these in the fridge for a few minutes before the next step if the heat of your hands is making them melt.)
    4. Draw on Jack’s face: Use an edible ink pen to draw a skeleton face on each orb. You may need to wipe the hot cocoa bombs before drawing, if they’re getting condensation on them.
    5. To serve, heat up coffee or milk. Place a hot cocoa bomb in each mug, then top with your drink or choice. Stir thoroughly—and check to make sure it’s cool enough to enjoy—before taking a sip.

    This post includes affiliate links, which help fund the hosting of this site.

  • How to Make Baby Yoda-inspired Cupcakes

    How to Make Baby Yoda-inspired Cupcakes

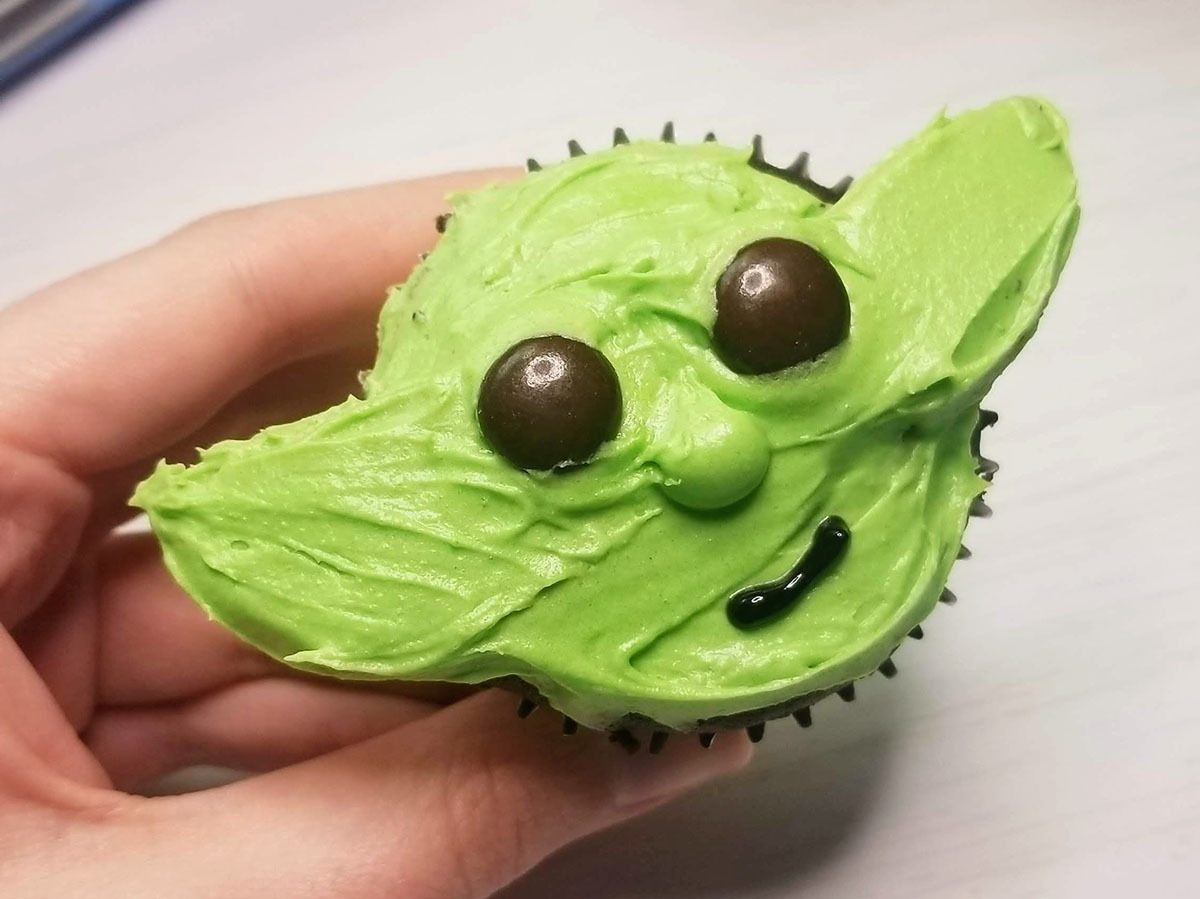
    Wait, so you’re not hosting a watch party for one and making all kinds of Grogu-inspired treats every Friday, when a new episode of The Mandalorian hits Disney+? Huh. Strange. Well, these Baby Yoda cupcakes may just convince you to start. They’re ridiculously cute—and also ridiculously easy to make (like maybe even easier than the Sesame Street and Winnie the Pooh cupcakes).

    Baby Yoda Cupcakes Tutorial - How to Make The Child Cupcakes
    Photos: Candace Braun Davison

    You can use any cupcake flavor or recipe as the base (though I’m partial to chocolate), and from there, the hardest part is breaking Oreos in half to form The Child’s ears. Seriously.

    What You’ll Need to Make Baby Yoda-Inspired Cupcakes:

    • 1 (16-ounce) container vanilla buttercream frosting
    • 4 to 6 drops green food coloring
    • 12 chocolate cupcakes, baked and cooled
    • 6 Oreos, halved and cream removed
    • 24 brown M&M’s
    • black gel icing

    How to Decorate ‘Em:

    1. Add food coloring to buttercream frosting, a few drops at a time, stirring in between, until it becomes a pale green.
    2. Spread a thin layer of green buttercream frosting atop a cupcake. Take one Oreo half and carefully break it in half lengthwise, forming two semicircles. Place them along the top half of the cupcake, forming Baby Yoda’s ears. (They’ll protrude slightly on either side of the cupcake.) Spread more green buttercream on the cupcake, covering the Oreo ears. Add a dewdrop-sized dollop right in the center to form Baby Yoda’s nose.
    3. Gently press two brown M&M’s just above the nose, M-side down, to form The Child’s eyes. Use black gel icing to draw his mouth. Repeat with remaining cupcakes.
Optimized with PageSpeed Ninja